
Additional services that still need scheduling can appear in the missing schedule counts.
Use this as a quick check that quoted additional work has not been left unscheduled.Schedule Wizard
Use Schedule Wizard to turn accepted contract information into clean recurring work. Work through each step in order so the site, geofence, dates, hours, staff assignment, cleaning specification, and audit schedules all agree before schedules go live.
Contract required
Schedule Wizard works from a contract. If there is no contract, there is nowhere for the schedule to belong.
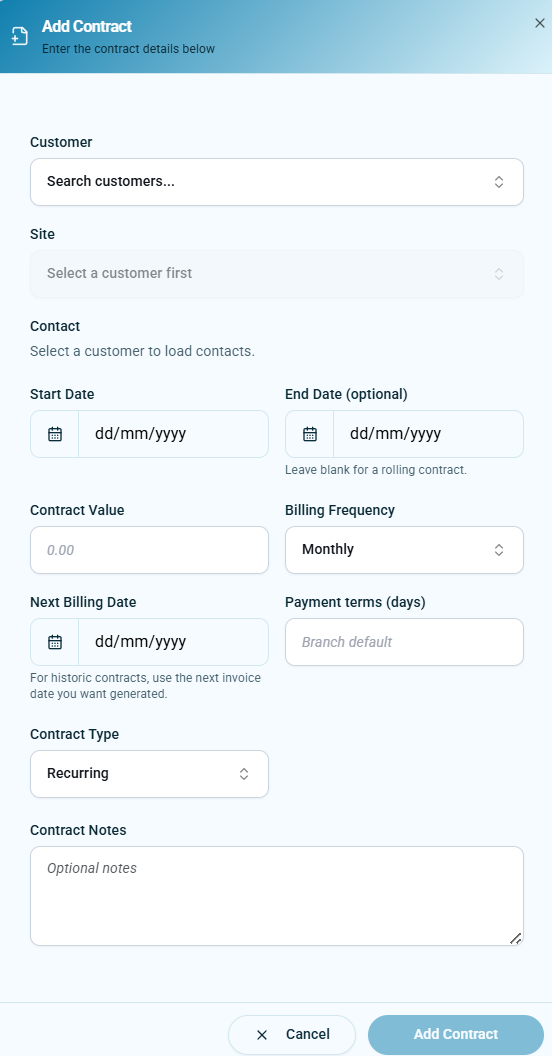
A contract is added automatically when a quotation is accepted or when a one-off job is added. If work needs scheduling but there is no quotation and no one-off job, go to Contracts and use Add Contract. This creates the contract record needed before Schedule Wizard can add recurring schedules.
Accepted quotationKleanFlo creates the contract automatically from the accepted quotation details.
One-off jobKleanFlo creates the contract automatically when the one-off job is added.
Manual contractUse Contracts > Add Contract when there is no quotation or one-off job but recurring schedule setup is required.
Why it mattersThe contract gives Schedule Wizard the customer, site, dates, billing details, contract type, and schedule container.
- Check whether a contract already exists. Look for the customer and site under Contracts before creating another record.
- Create a contract only when needed. If the work came from an accepted quote or one-off job, the contract should already exist.
- Enter the required contract details. Select customer, site, start date, contract type, billing details, and any useful notes.
- Return to Schedule Wizard. Once the contract exists, use Schedule Wizard to set dates, zones, schedules, additional services, specifications, and audits.
View Add Contract example
0Contract required
1Contracted hours
2Site assessment
3Zones
4Geofence
5Assign schedule
6Additional services
7Cleaning specification
8Audits
Confirm contracted hours
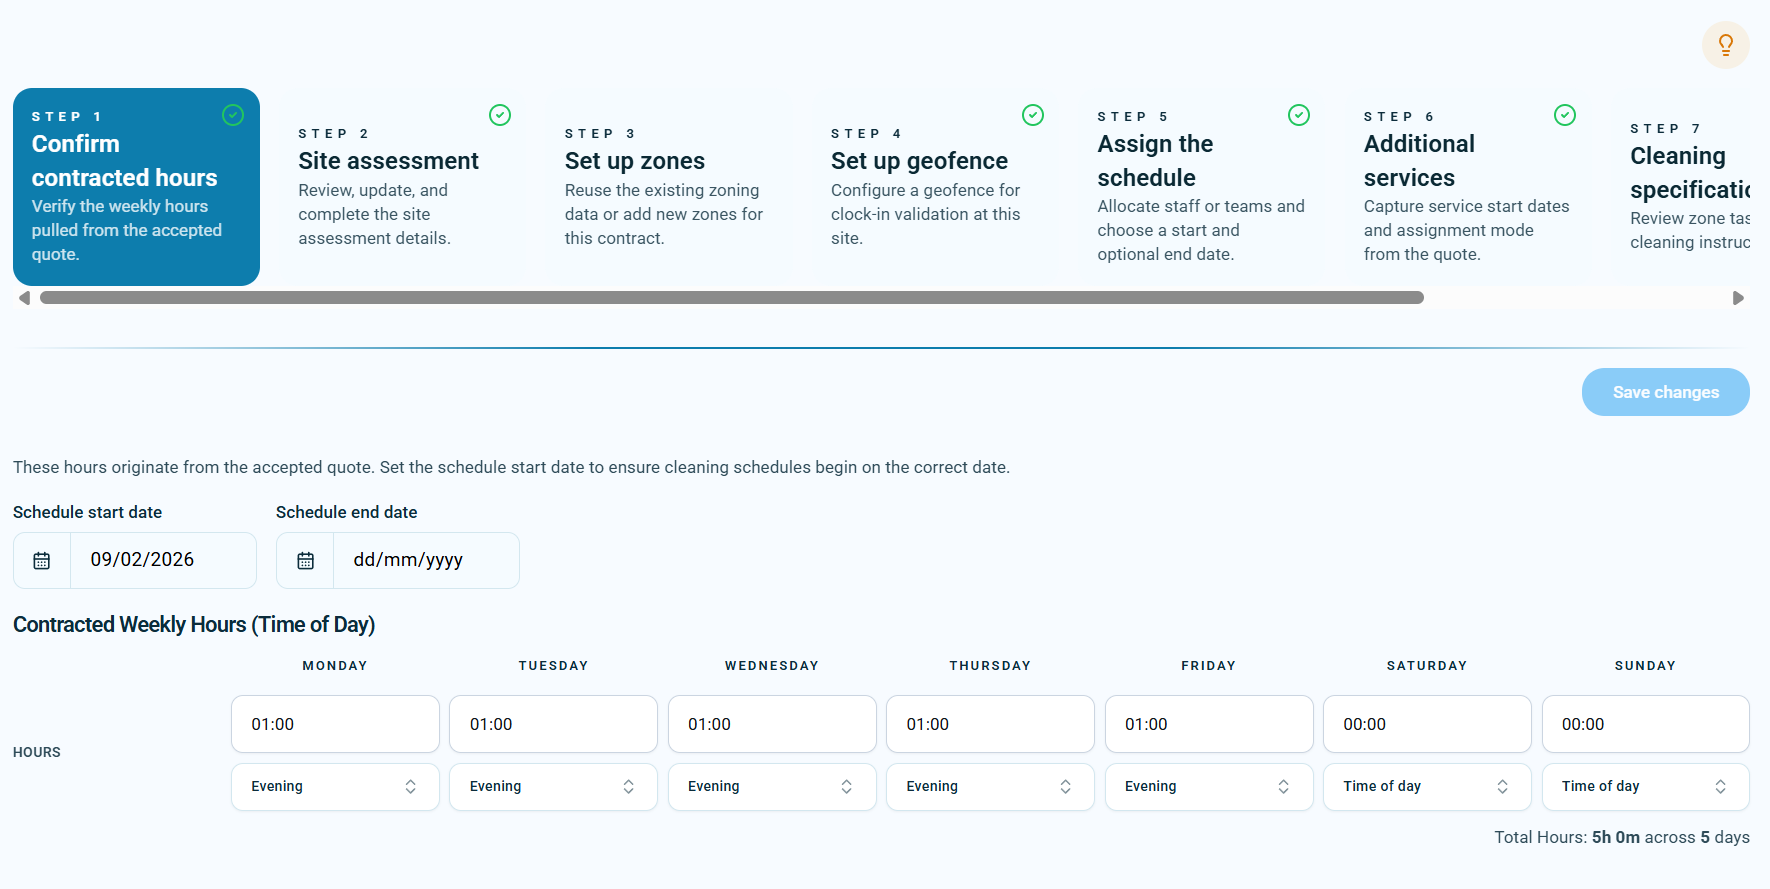
Start by checking the contract dates and weekly hours. These values control which schedule dates are valid and what hours should be planned.
Schedule start dateEnter the start date. This is required because schedules created later will be checked to make sure they fall inside the contract schedule dates.
Schedule end dateAdd the end date when it is known. Leave it blank only when the contract is open-ended or the end date is not confirmed.
Hours and time of dayIf hours and time of day already appear, they normally came from acceptance of the quotation. Check they match the agreed contract before continuing.
- Confirm the schedule start date. This is the earliest date recurring cleaning schedules should begin.
- Enter the schedule end date if known. This prevents future schedules being created beyond the agreed contract period.
- Check the weekly hours. In the example, Monday to Friday each show 01:00 and Saturday/Sunday show 00:00.
- Check the time of day. The time of day, such as Evening, comes from the quotation and influences how the work is planned.
- Save changes before moving on. Correct dates and hours here reduce schedule errors later.
View contracted hours example
Site assessment
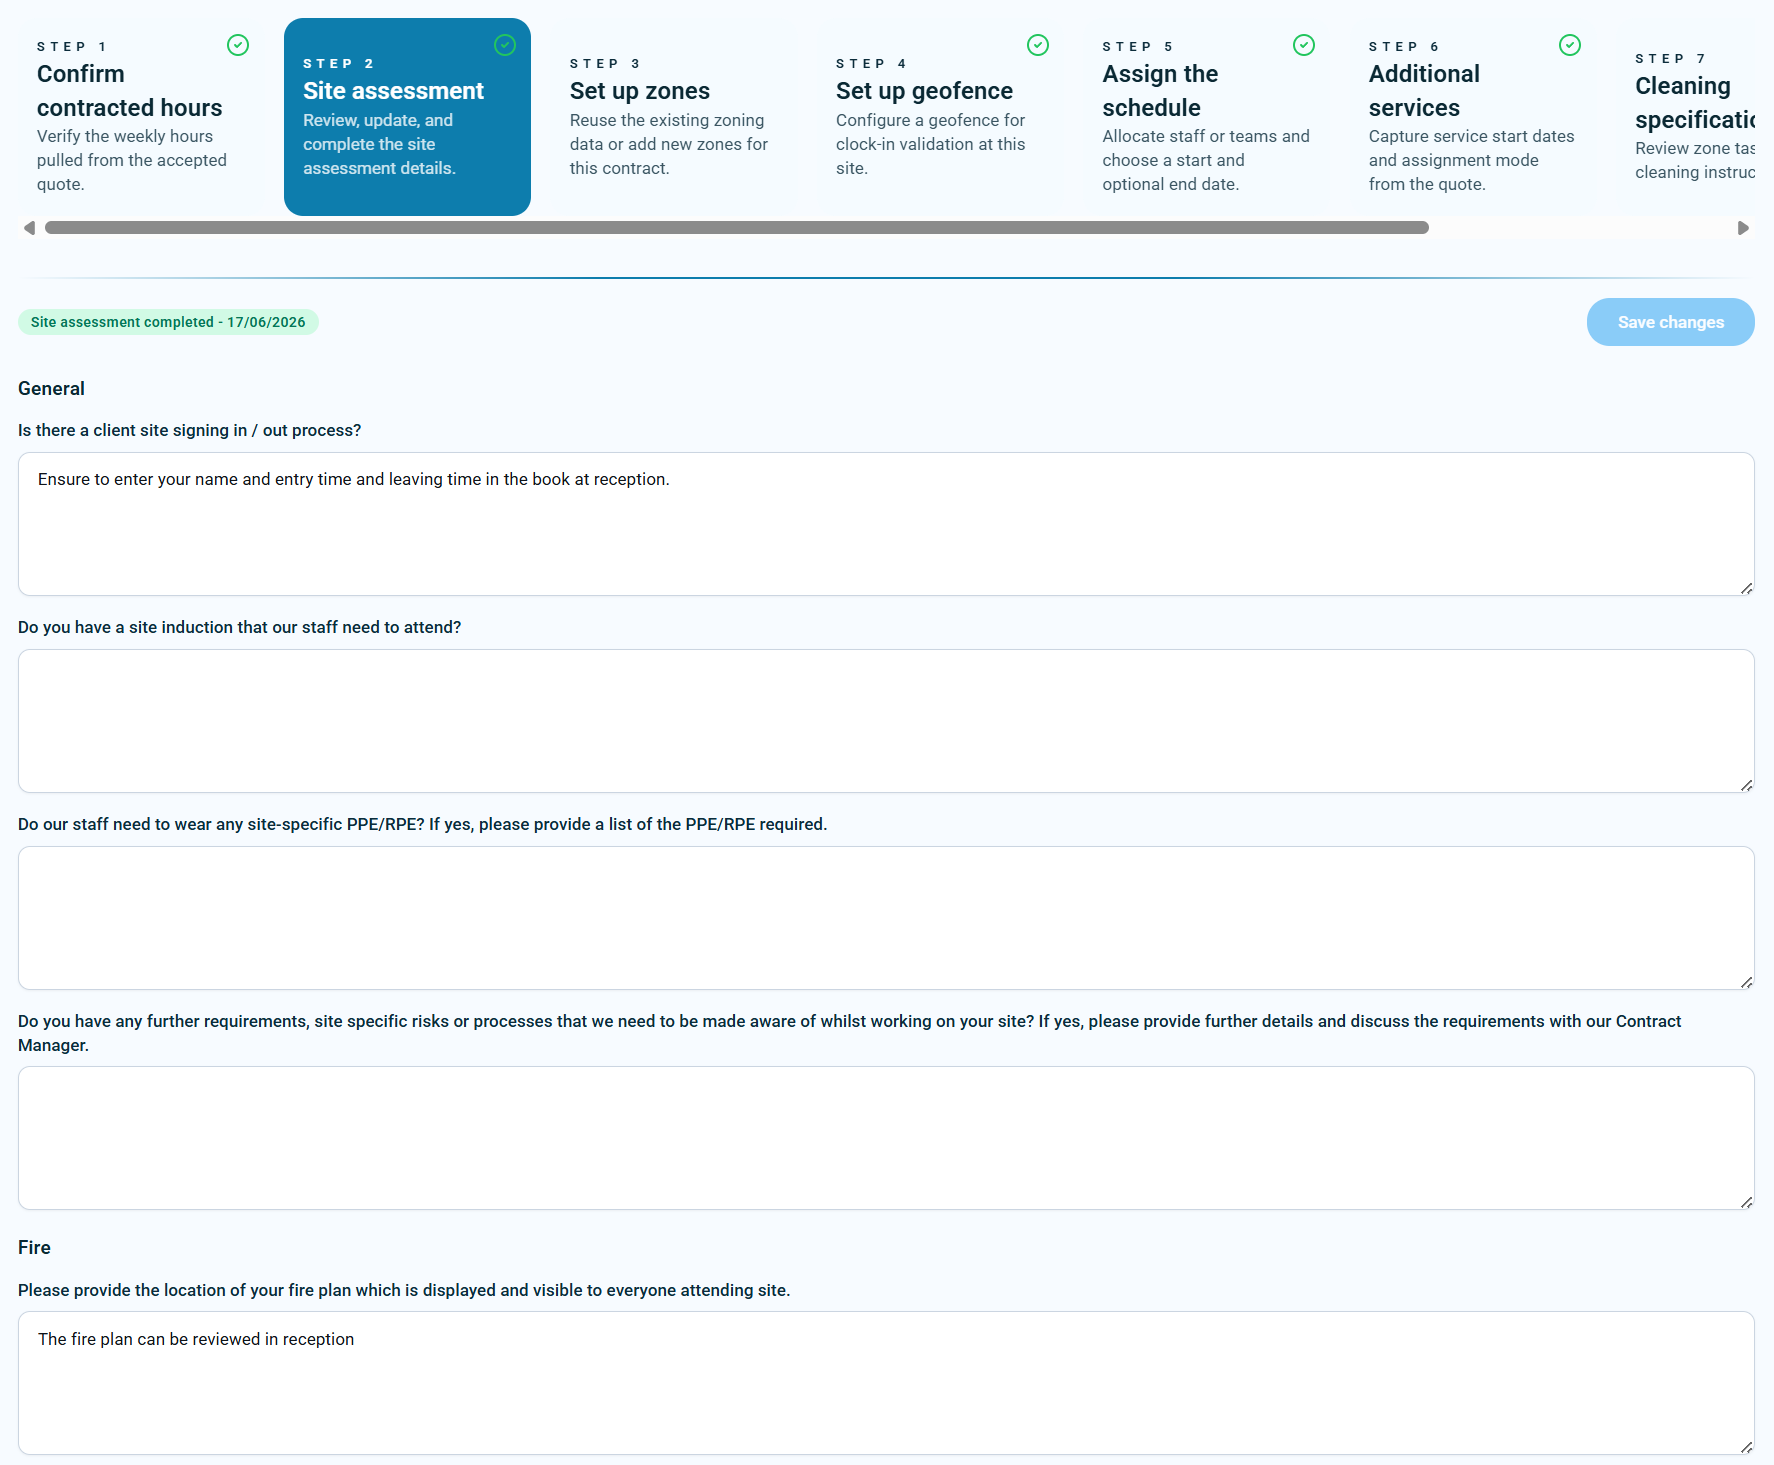
Review, update, and complete the site assessment details before schedules are finalised.
The site assessment can be completed by a supervisor in the KleanFlo web app, by a supervisor using the On The Move app, or by the customer if they have access to the customer portal. If the customer is expected to complete it, check Customer Portal setup first so the right contact has access.
Web appSupervisors can complete or update the assessment from KleanFlo when reviewing the customer and site setup.
On The Move appSupervisors can capture assessment details while on site, away from the desk.
Customer portalCustomers can complete the assessment when the correct contact has portal access and the assessment request has been sent.
What to captureClient sign-in/out process, induction, PPE/RPE, site-specific risks, access notes, fire plan location, and operational requirements.
StatusCheck whether the assessment is incomplete, sent to a contact, or completed.
Do not skip itMissing assessment details can leave staff without key site instructions before work starts.
Customer accessIf the customer will complete it, confirm portal contact setup before chasing the assessment.
View site assessment example
Set up zones
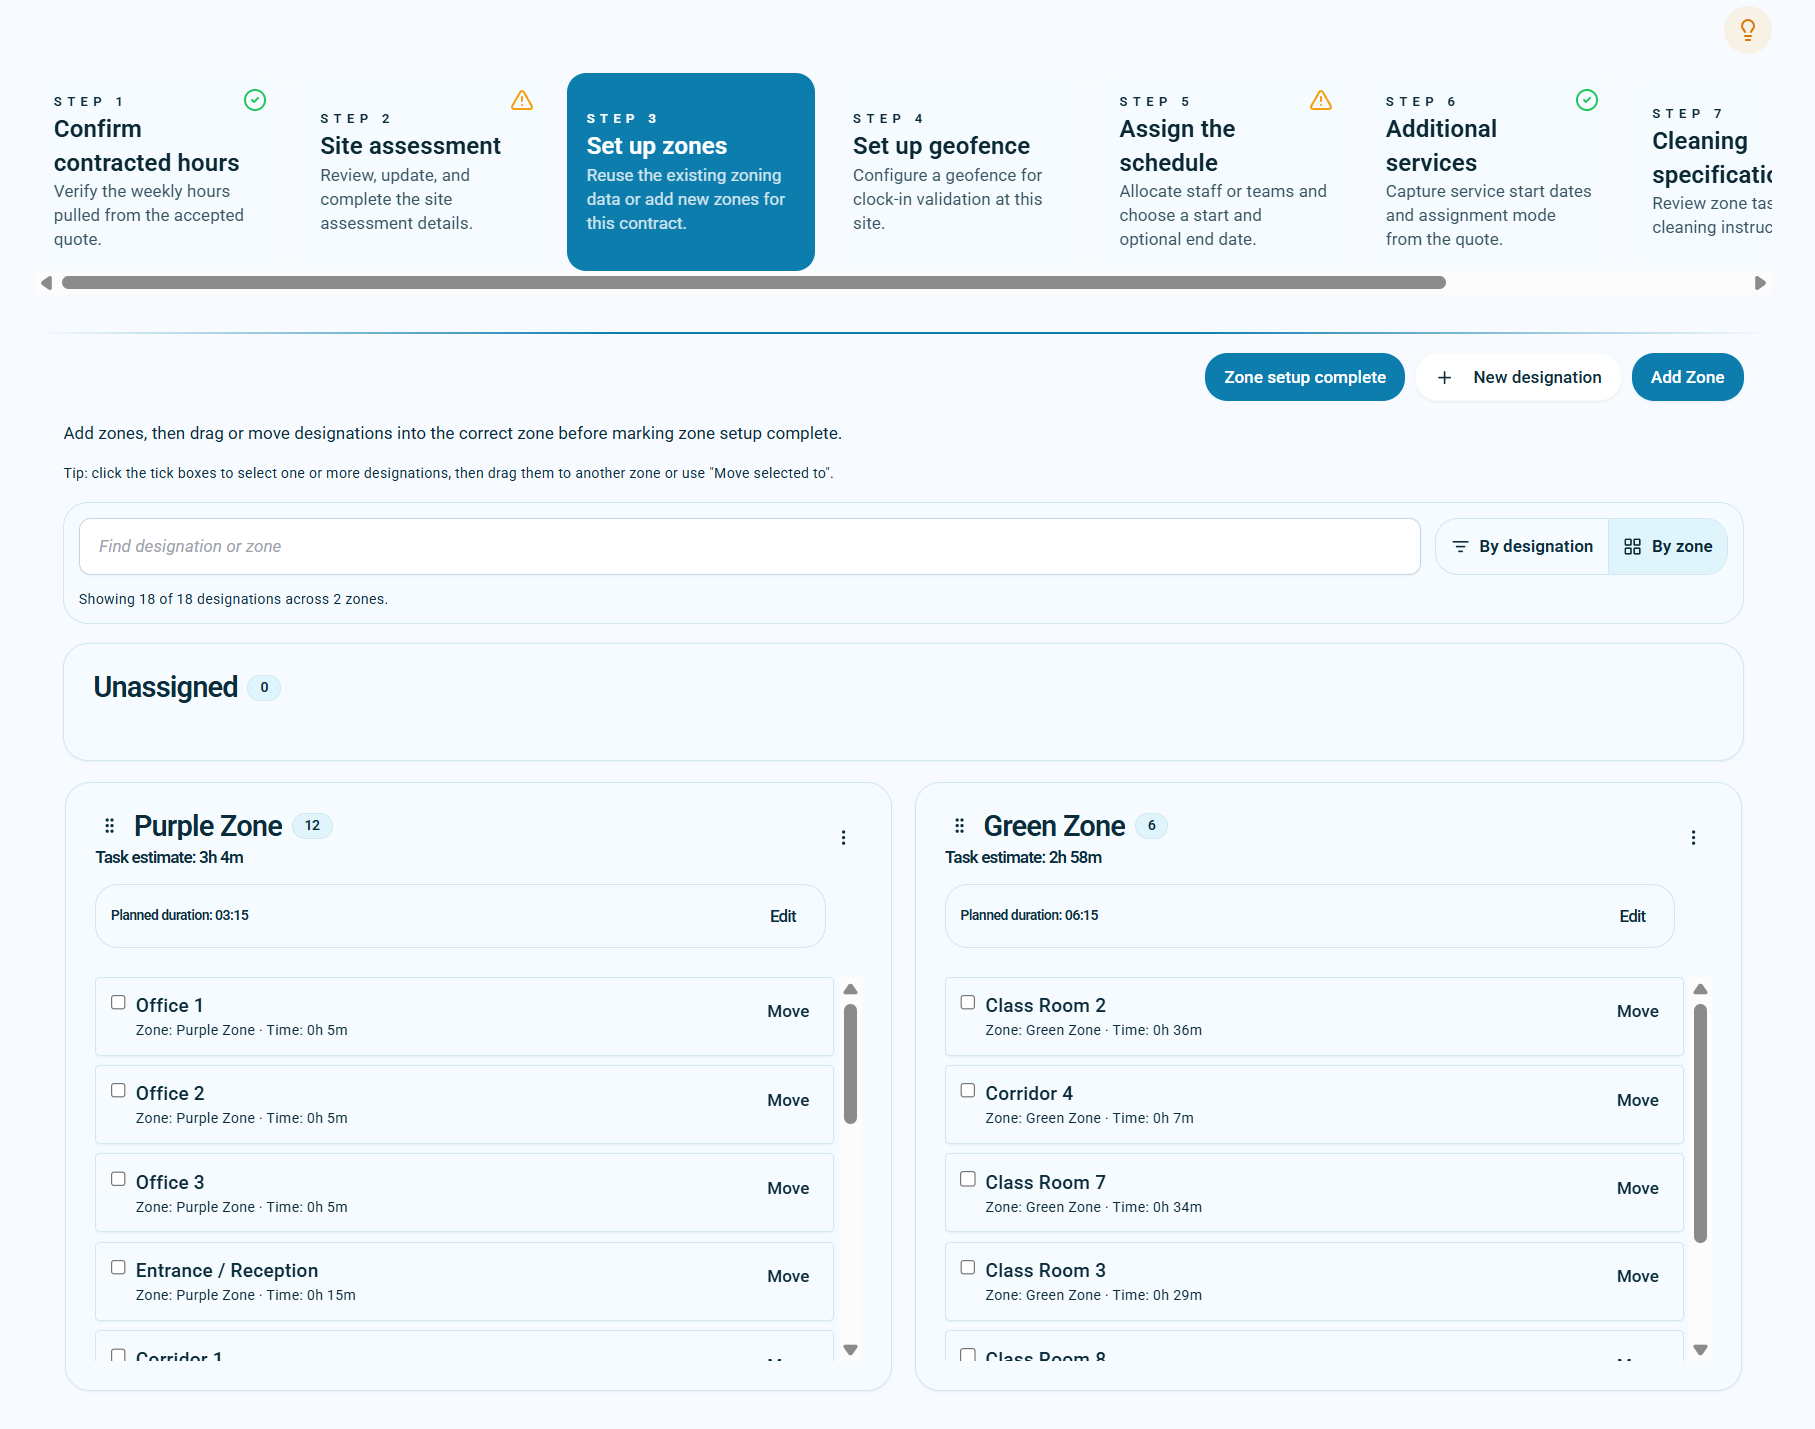
Zones group designations into working areas. Schedules, audits, and cleaning specifications all work with zones, so this step is important before schedules are created.
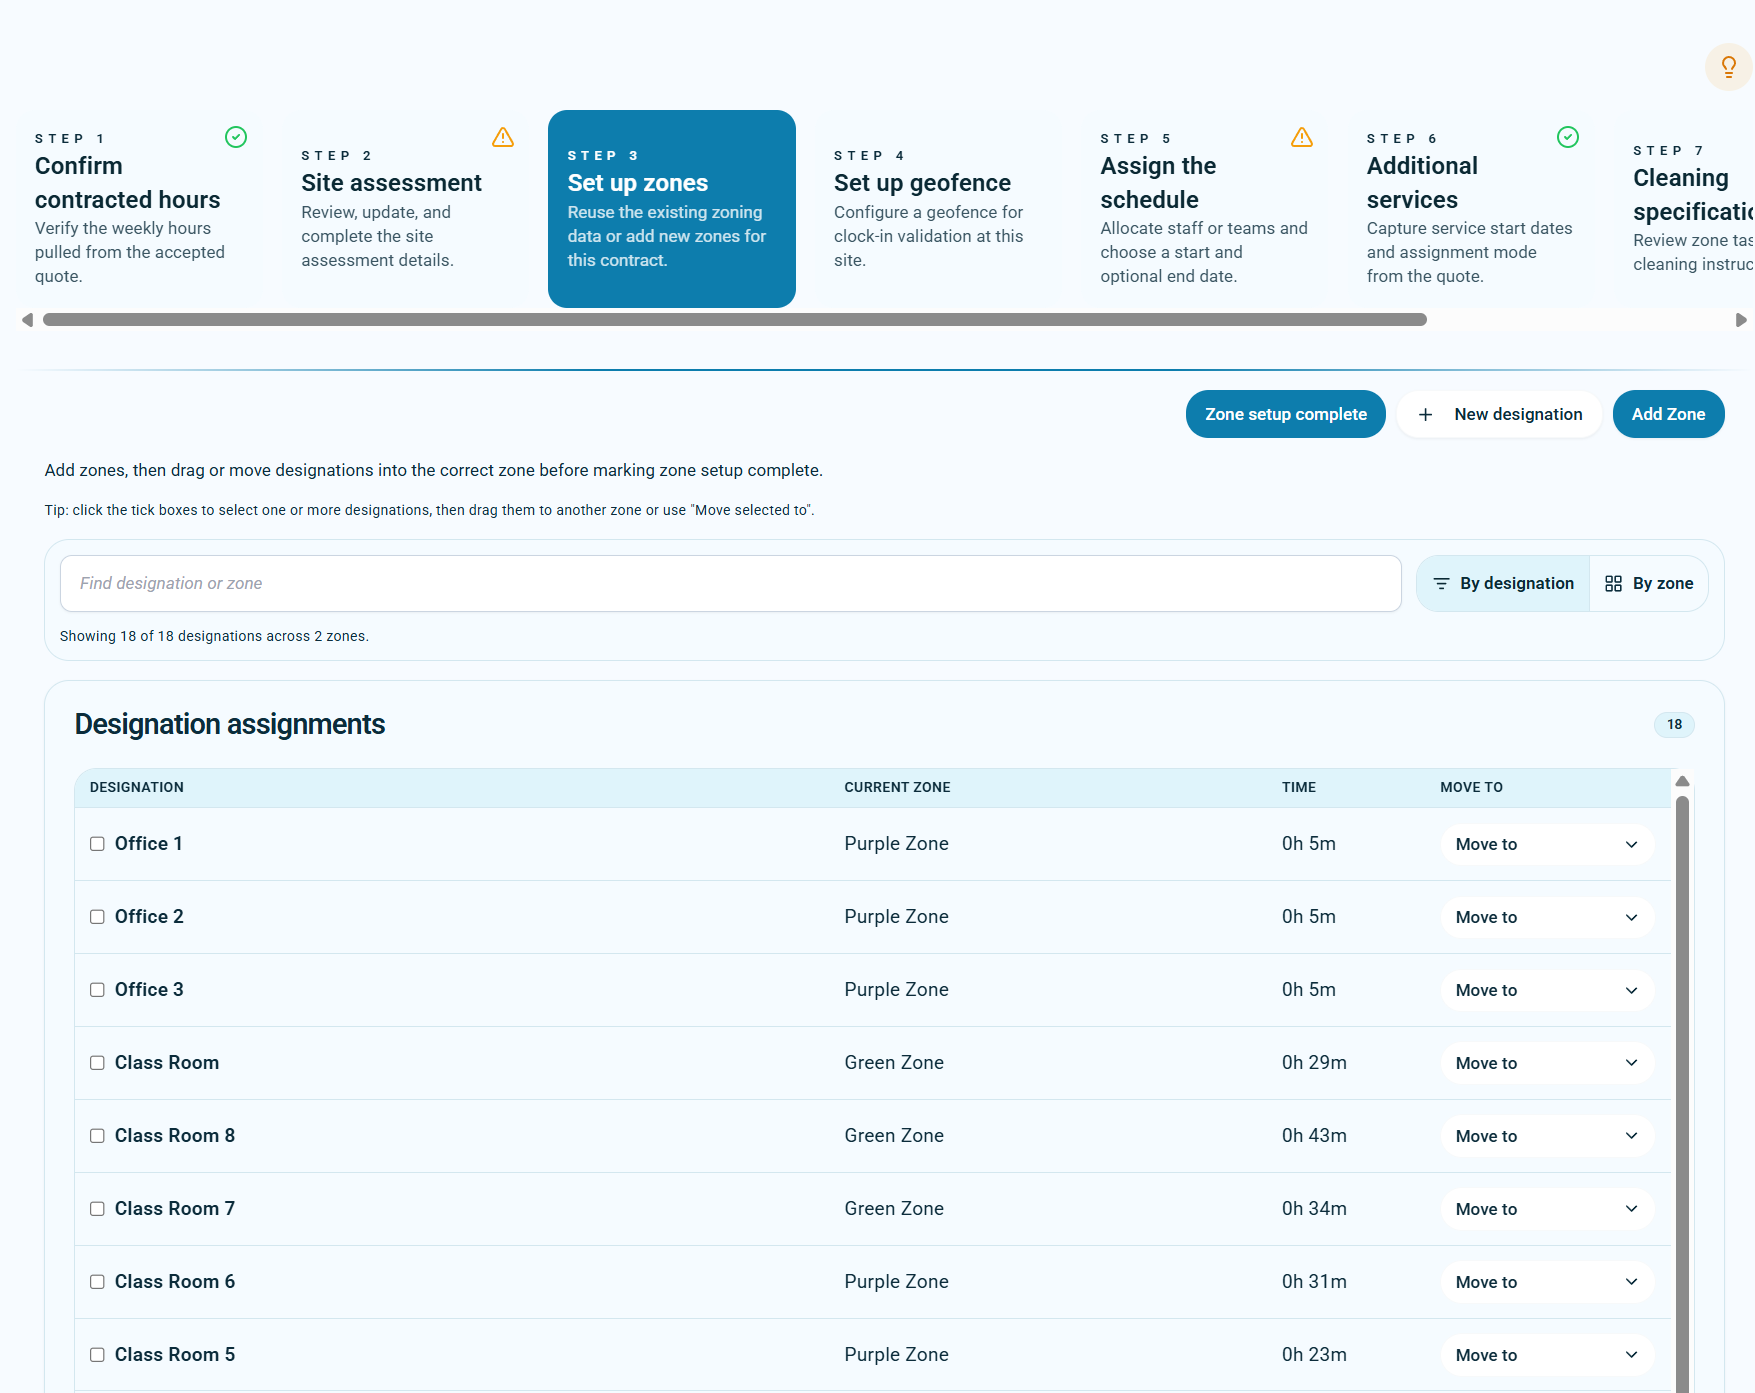
BLISS did not have zones, so imported designations are added to one default zone. When a quotation is accepted, KleanFlo creates one zone containing all designations from the accepted work. You can keep one zone, rename it, or create additional zones and move designations between them.
One staff memberFor a simple site with one staff member, one zone is usually enough. Rename the default zone so it makes sense to the franchisee and staff.
Multiple staffMultiple staff on the same site usually makes multiple zones useful, because each person can be assigned a clearer working area.
Lots of designationsZones make audits and cleaning specifications easier to manage when the site has many rooms, areas, or designation tasks.
How to organise designations
- Review the default zone. Imported BLISS work or accepted quotation work may start in one default zone.
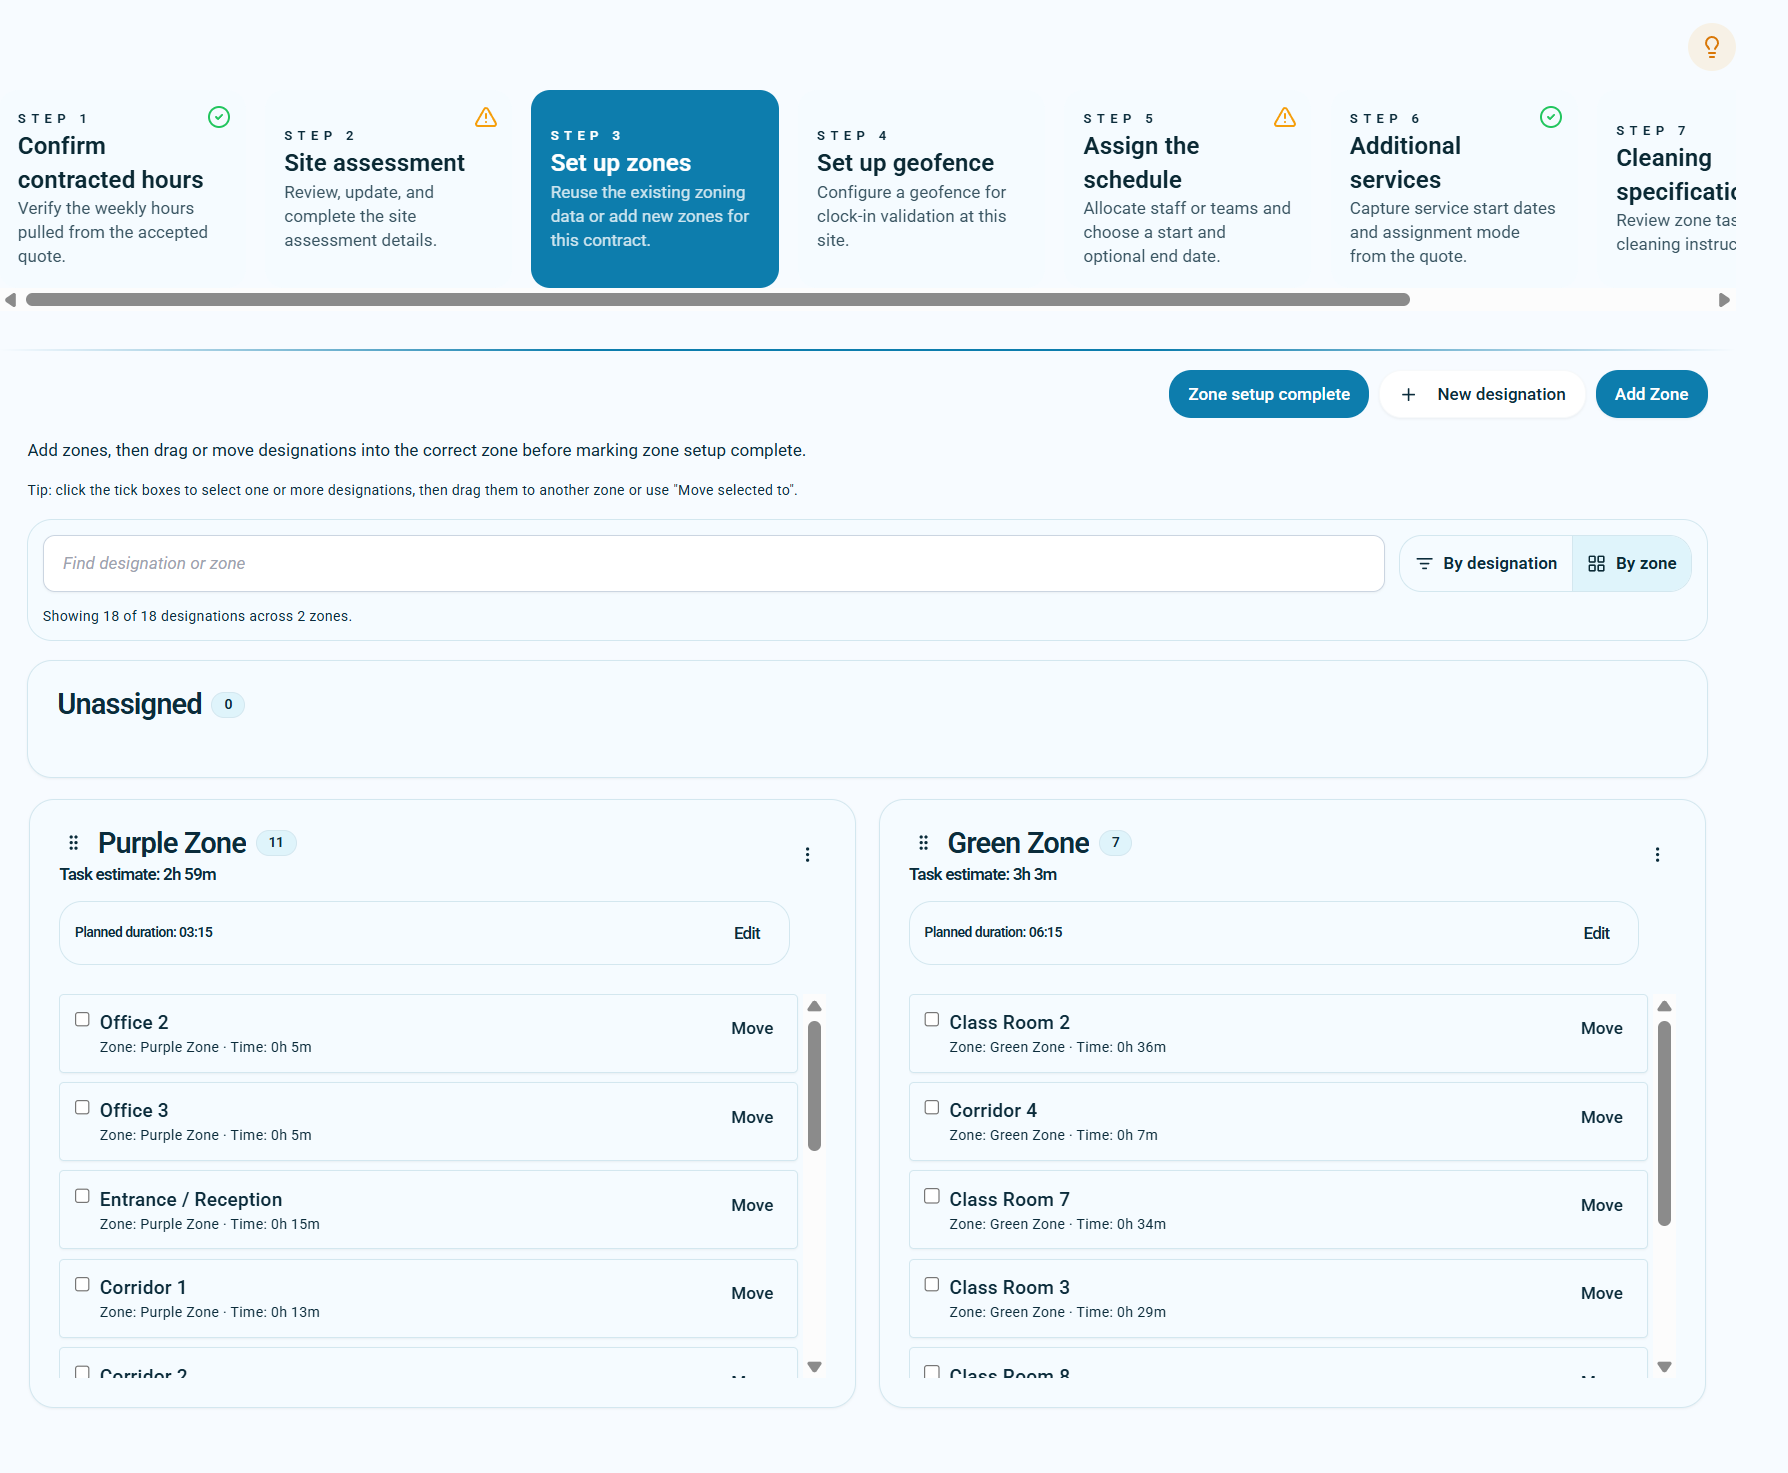
- Add zones if needed. Use Add Zone for areas such as floors, buildings, departments, or staff work areas.
- Add extra designations if required. Use New designation when an extra area or task needs to be included.
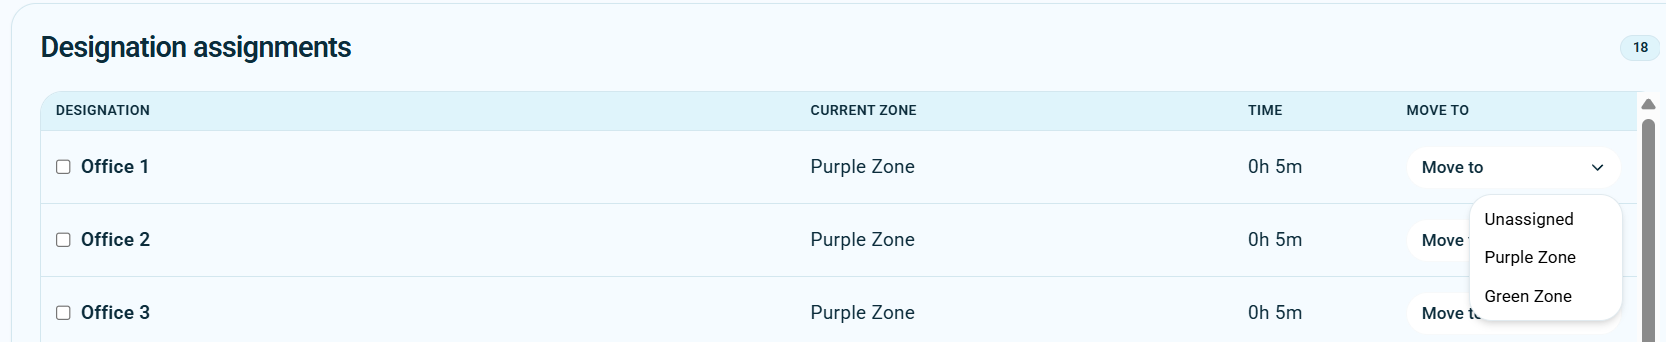
- Move designations between zones. Use drag and drop on the By zone tab, or use By designation and the Move to dropdown.
- Check planned duration by zone. Each zone has planned cleaning time. These zone times are used when default schedules are created.
- Click Zone setup complete. Only complete this step once designations are in the correct zones. This sets the green tick on Step 3.
Create default schedules from zones
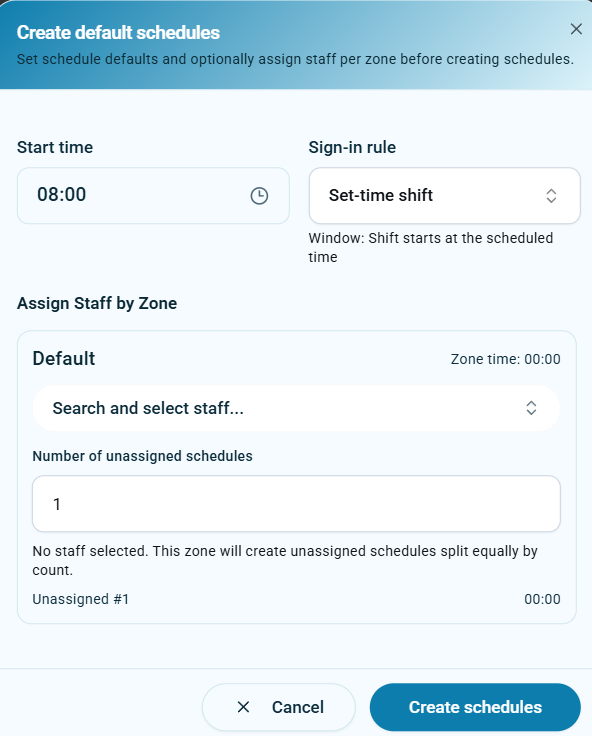
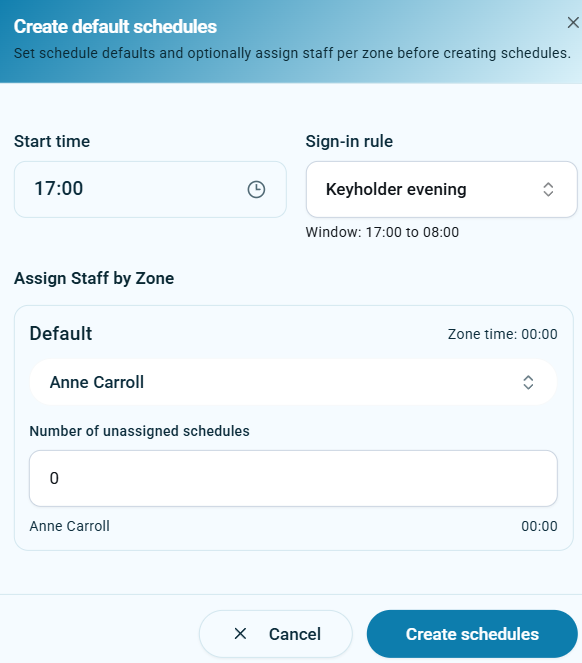
Once zones are complete, Create default schedules can be used once to generate default schedules. The dialog uses the schedule start date, the zone planned cleaning times, the start time, and the sign-in rule. You can assign staff by zone, assign multiple staff where needed, or leave schedules unassigned for later allocation.
Start timeThe default schedule start time, such as 08:00 or 17:00.
Sign-in ruleExamples include Set-time shift or Keyholder evening. This affects check-in alert windows.
Assign staff by zoneSelect a staff member for each zone where the regular cleaner is known.
Unassigned schedulesIf no staff is selected, enter how many unassigned schedules should be created for that zone.
View zone setup examples
View default schedule creation examples
Set up geofence
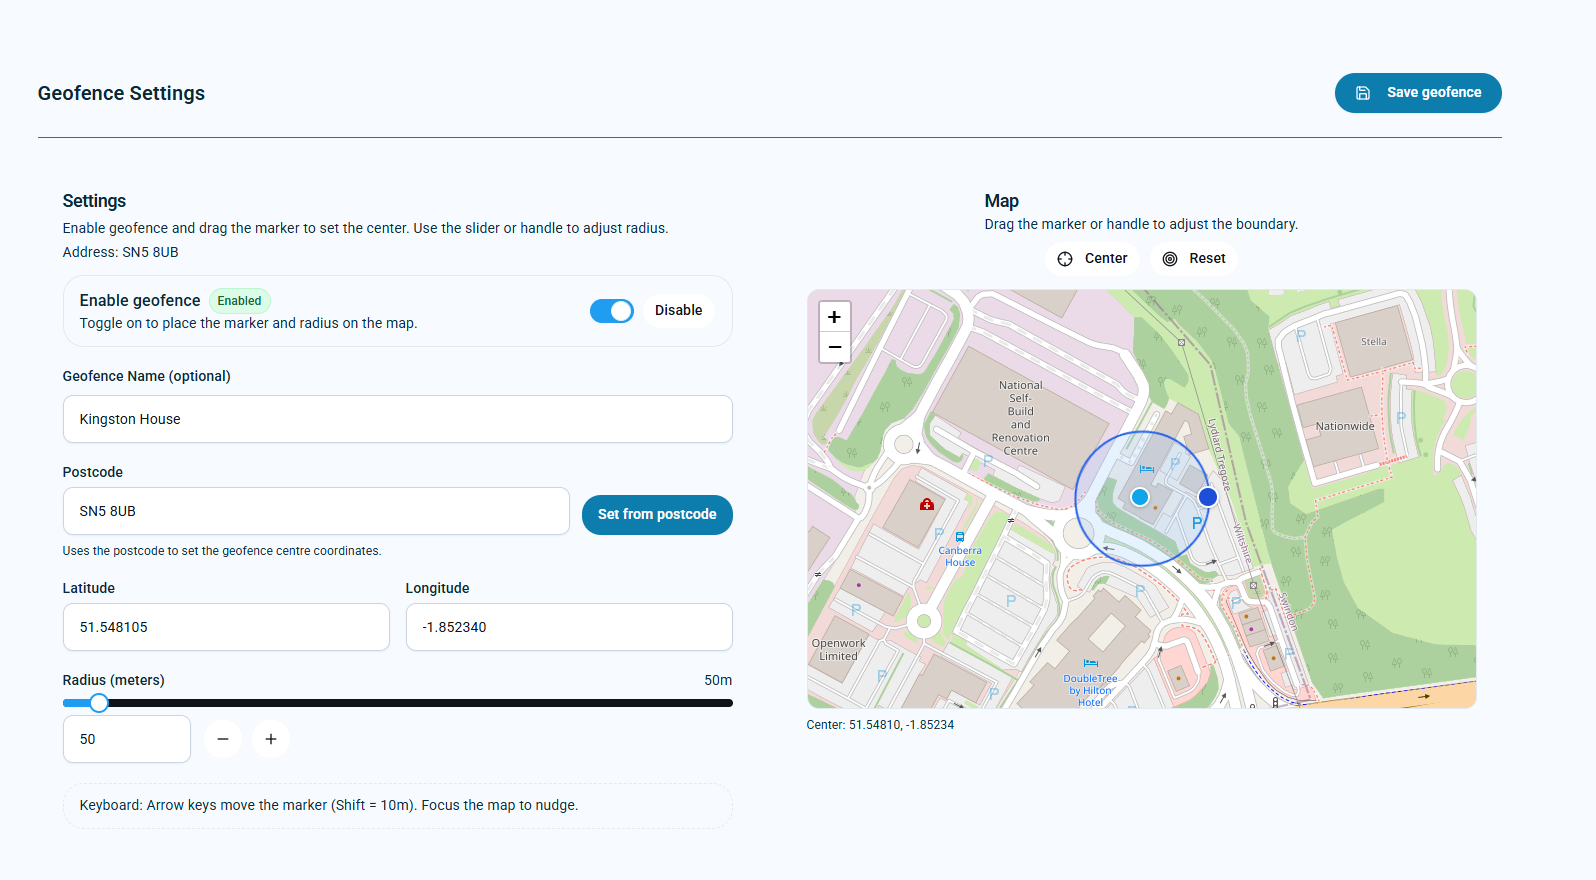
Configure a site boundary for clock-in and clock-out validation.
Set the geofence before schedules are assigned so staff check-ins and check-outs are measured against the right site boundary from day one. A good geofence reduces false outside-location warnings in Timesheets and avoids unnecessary payroll/admin queries.
Enable it for the siteTurn geofence on when the branch wants check-in and check-out location validation for this site.
Do not trust postcode aloneSet from postcode is only a starting point. Always check the marker on the map because postcodes can point to a road, car park, or nearby building.
Match real working behaviourSet a radius that covers where staff realistically check in, such as the entrance, reception, building, or working area.
- Check the site address first. A wrong address or postcode will make the geofence harder to set correctly.
- Set the centre point. Use the map marker to place the geofence over the actual cleaning location.
- Adjust the radius. Make it large enough for normal check-in/check-out behaviour, but not so large that it covers unrelated locations.
- Save the geofence. Saved geofence settings will be used when staff check in or check out against scheduled work.
- Review warnings later in Timesheets. If staff are flagged outside the geofence, check whether they were genuinely outside or whether the geofence needs correcting.
Good setupStaff can check in at the expected site location without repeated false warnings.
Poor setupTimesheets show avoidable outside-geofence warnings that need manual review before approval.
View geofence setup example
Assign the schedule
Allocate work to staff or teams and choose the schedule start and optional end date.
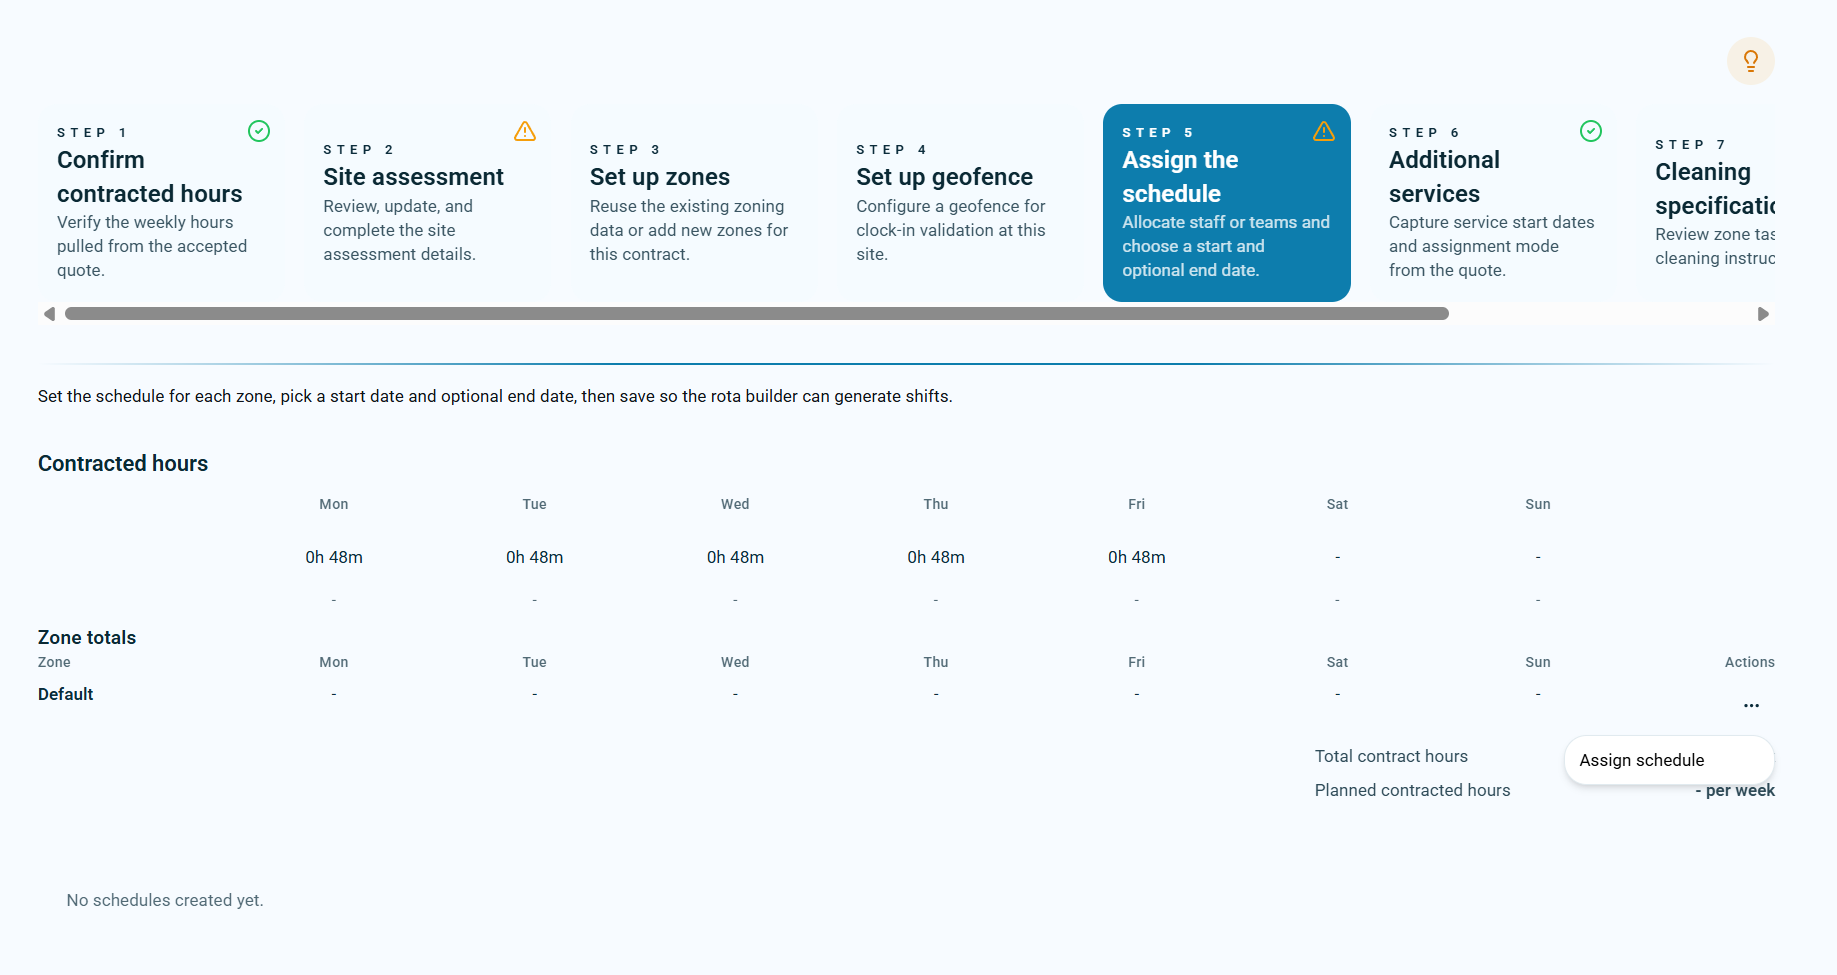
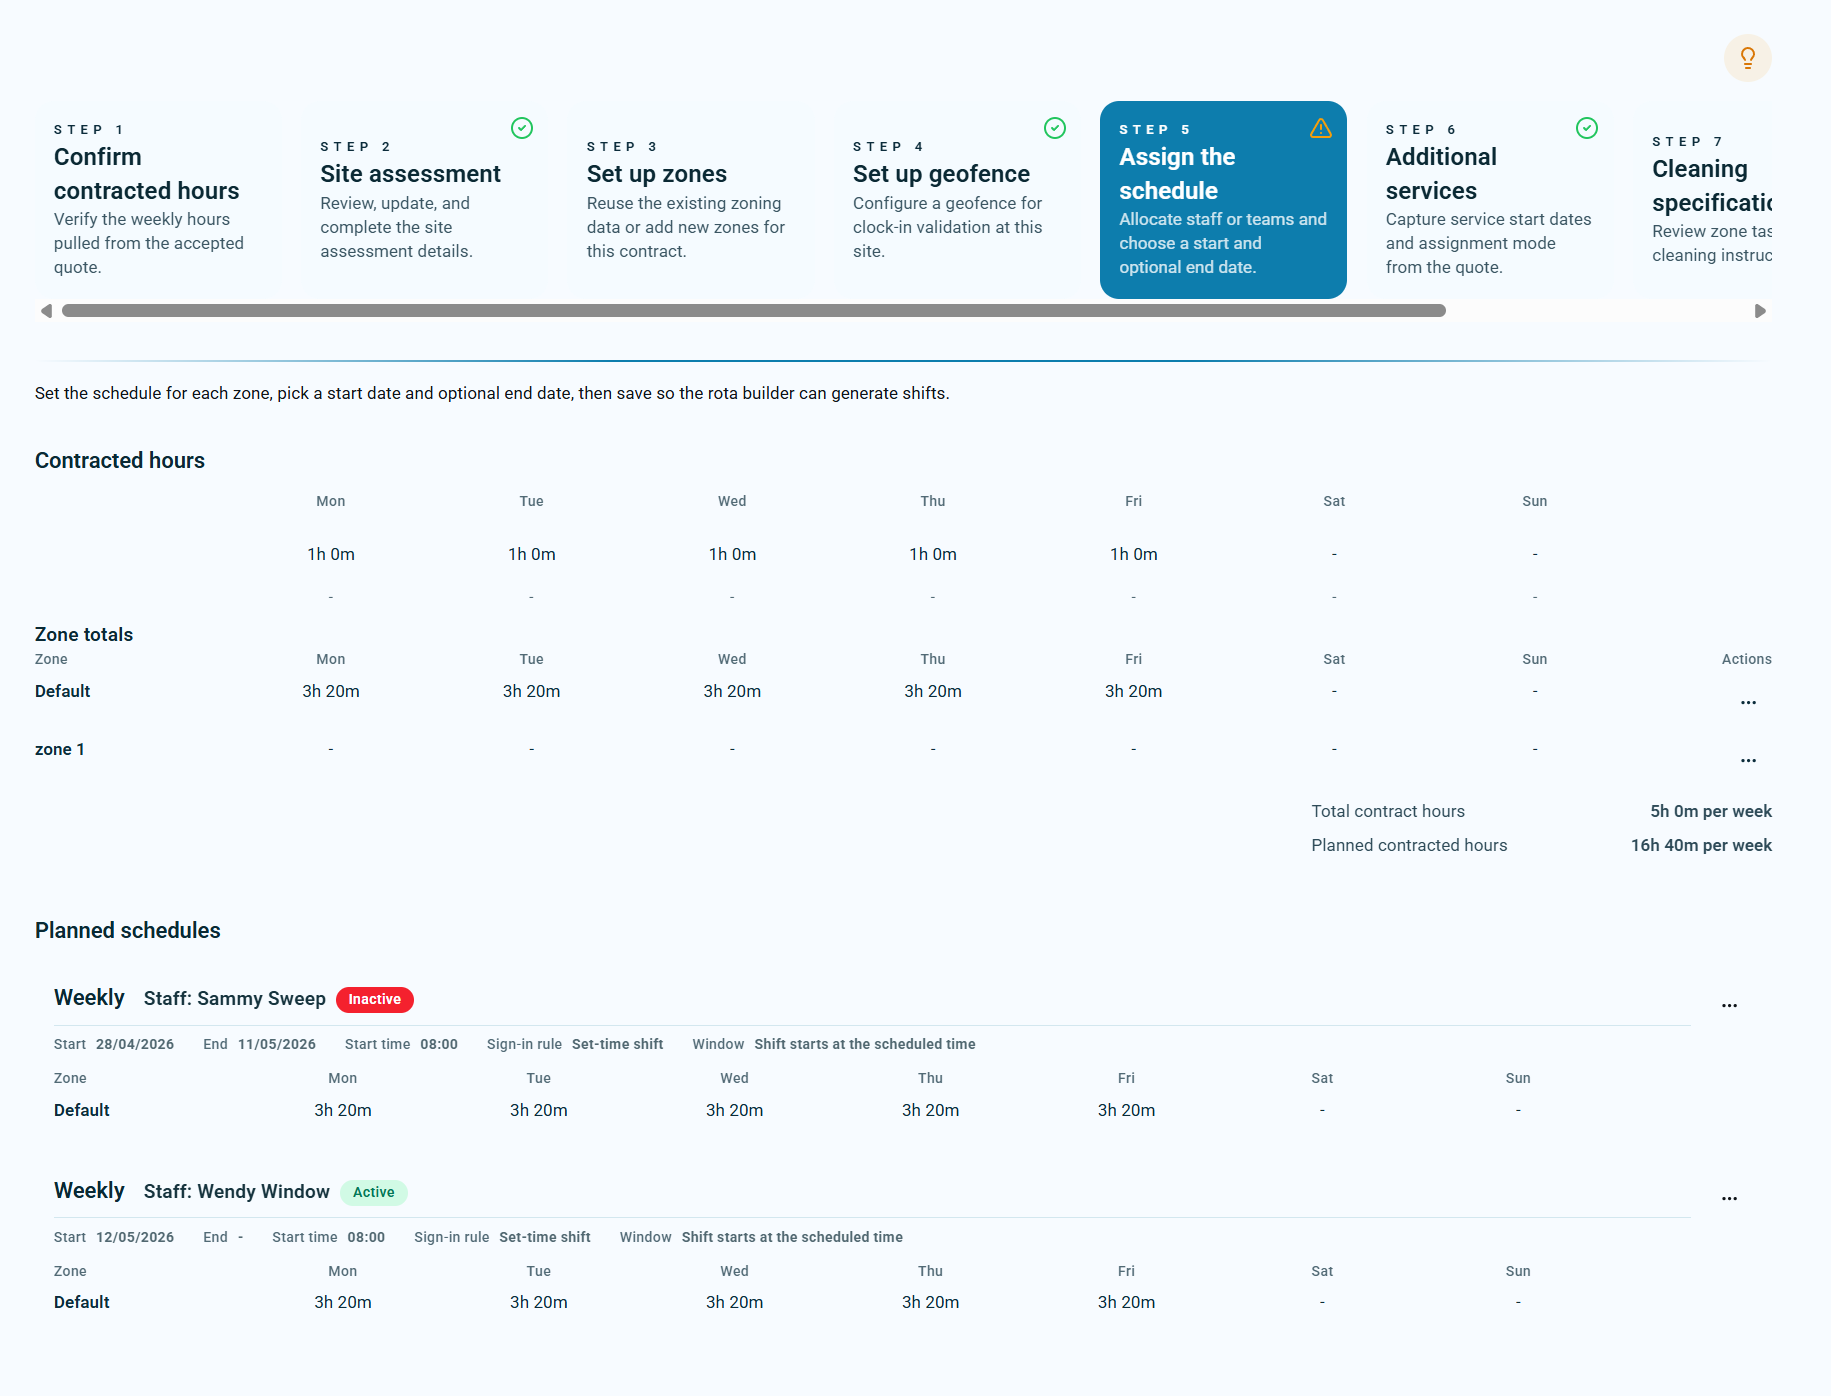
If default schedules have not been created from Step 3, this page shows the contracted hours and the expected schedule totals against each zone. Use this view to create or review schedules before the rota builder generates shifts. Once schedules are saved, they can be seen and checked in the Schedules calendar page.
Dates are checkedSchedules added here should sit inside the schedule start and end dates confirmed in step 1.
Staff or teamAssign the right person or team before go-live so Today's Plan and the staff app show the correct work.
Review in Schedules calendarAfter assignment, use the Schedules calendar page to check the recurring pattern before monitoring work in Today's Plan.
What the totals mean
Contracted hoursThe weekly hours agreed for the contract, pulled from the accepted quotation and confirmed in Step 1.
Zone totalsThe expected schedule time for each zone. If no schedules exist yet, zone totals may show dashes until schedules are assigned.
Active schedulesActive schedules count towards planned contracted hours for the relevant dates.
Inactive schedulesInactive schedules are shown for reference but should not be treated as live planned work.
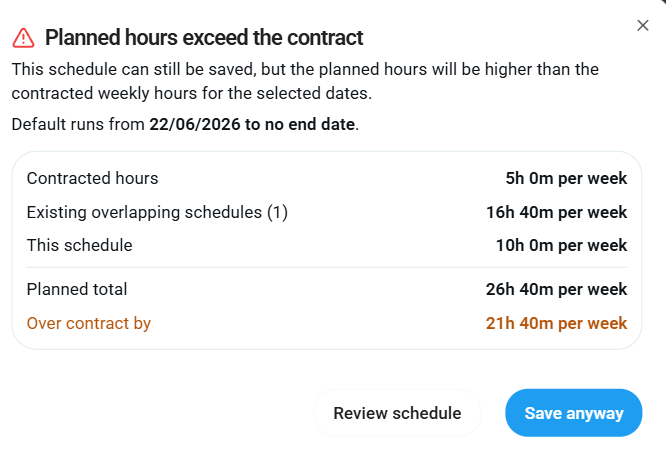
Over-contract warning
If the total time of active schedules is more than the contracted hours, KleanFlo shows a warning. The schedule can still be saved if the extra planned time is intentional, but the user should review the planned total before choosing Save anyway.
- Compare contracted hours to planned contracted hours. If planned contracted hours are higher, check which active schedules overlap the selected dates.
- Check active and inactive records. A previous inactive schedule may explain the history, but active overlapping schedules affect the current planned total.
- Review the zone and dates. Confirm the schedule belongs to the right zone and falls inside the contract schedule dates.
- Use Save anyway only when intentional. This is appropriate where the contract genuinely needs more scheduled time than the original weekly hours.
View assign schedule examples
Additional services
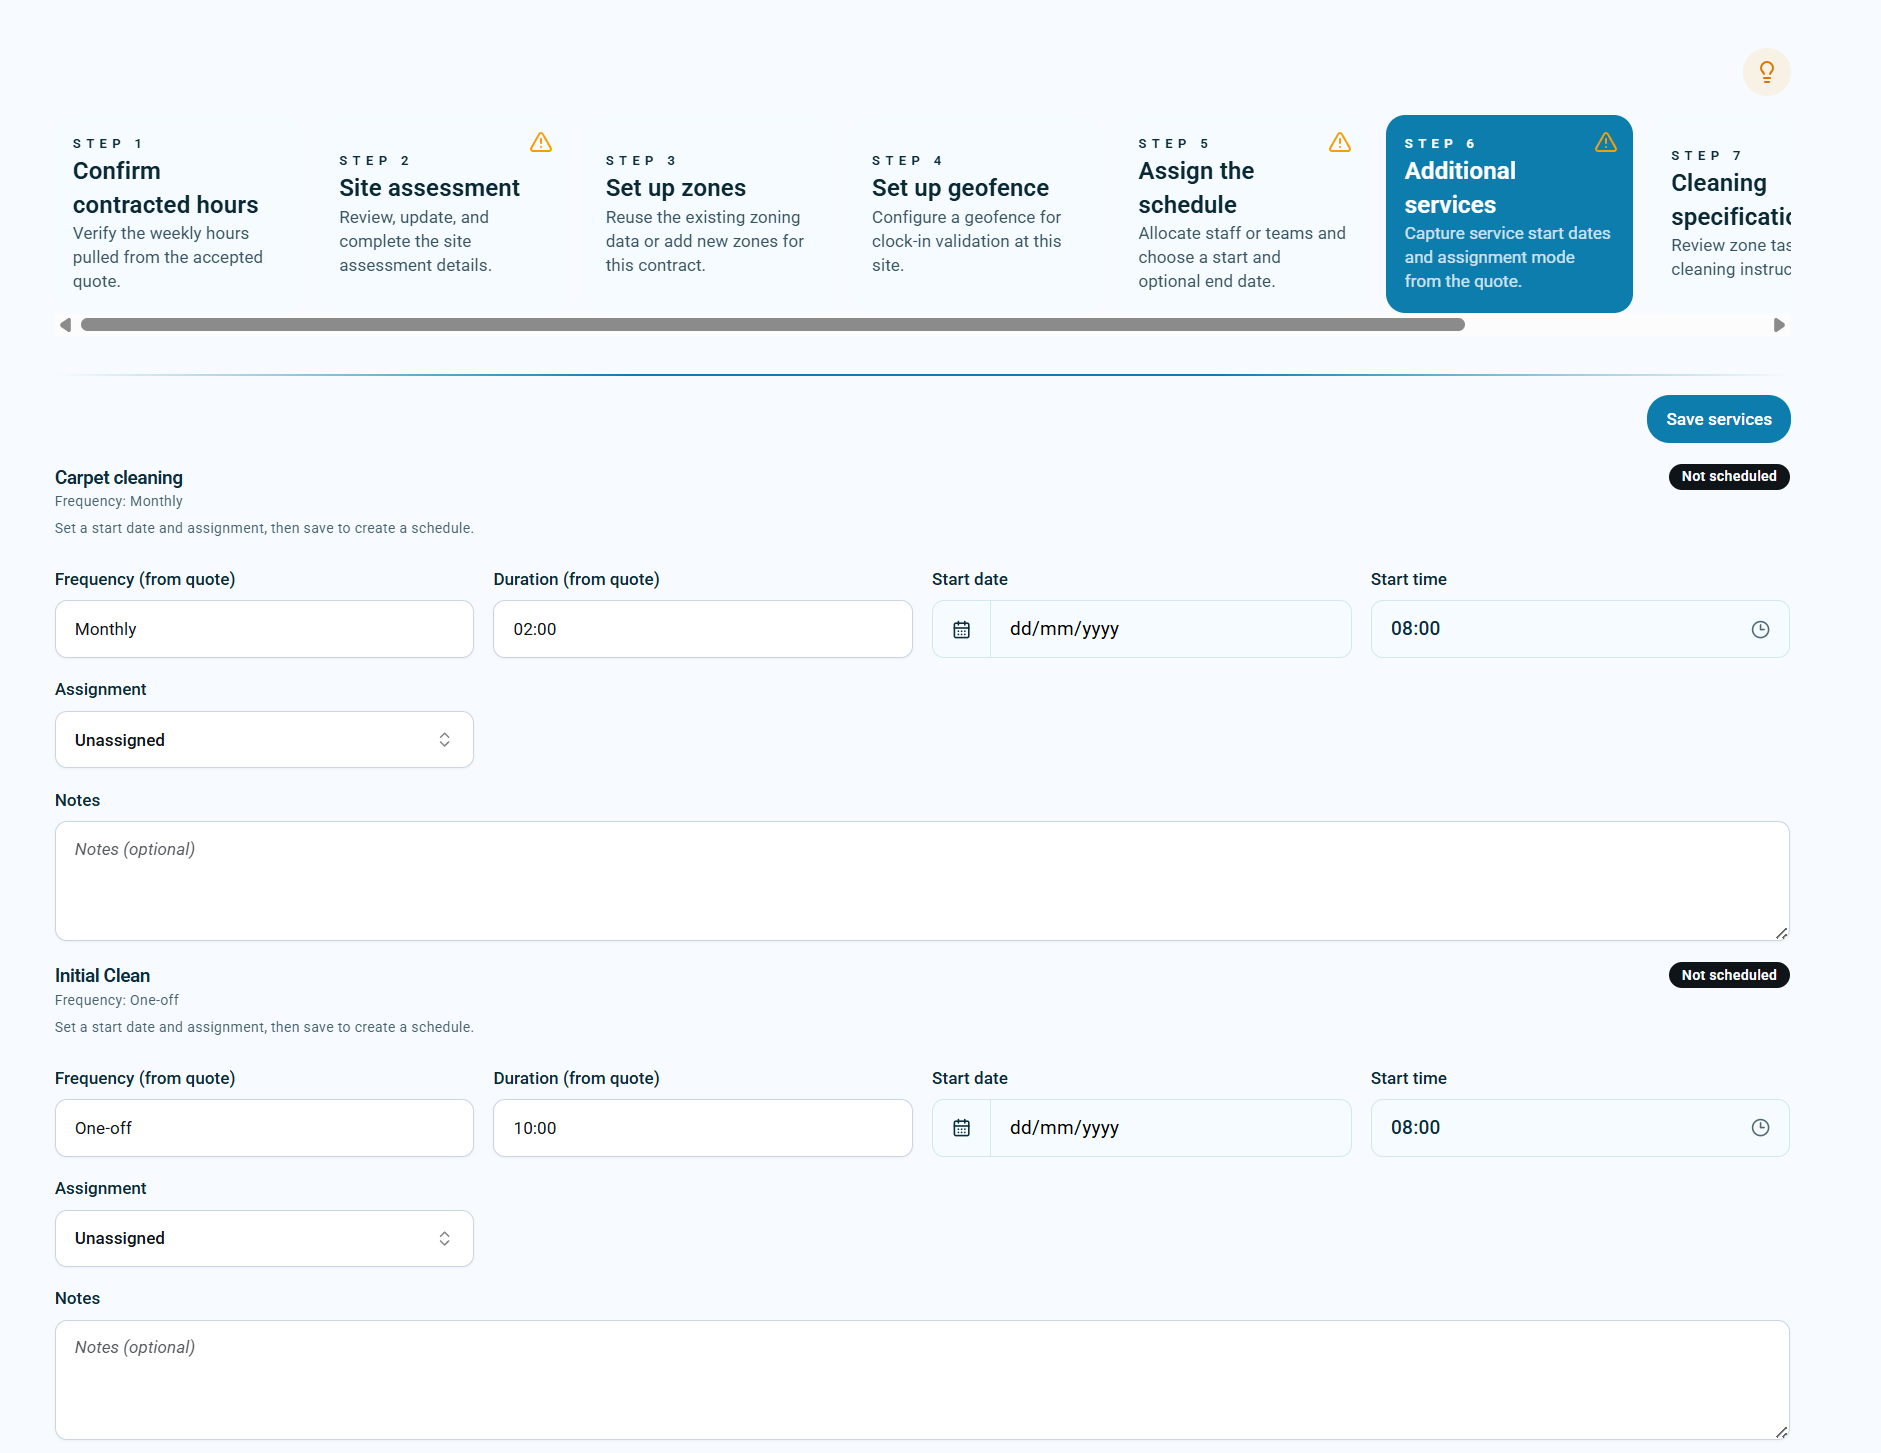
Capture service start dates and assignment mode for additional services included from the accepted quotation.
Additional services appear here when they were included in the accepted quotation. They are not moved across from BLISS. If an additional service is required but is not listed, create a new quotation and include the additional service details so there is a contract record for that work.
Frequency and durationThese come from the quotation. Check they match the service that was sold before saving.
Start date and start timeEnter when the service should first appear. Without a start date, the service remains Not scheduled.
AssignmentServices can be assigned to staff, assigned to a team, set as unassigned, or marked as Contracted out for a third-party company.
NotesAdd anything the office or supervisor needs to know, including contractor details where the service is contracted out.
- Check the service exists because it came from a quote. Do not add informal extra work here unless the contract has been created through a quotation.
- Enter the first planned date and time. This lets KleanFlo create the planned schedule for the service.
- Choose the right assignment mode. Use staff or team where KleanFlo users will do the work, unassigned where the branch still needs to allocate it, or Contracted out where a third-party company will complete it.
- Save services and check the status changes. The badge should move from Not scheduled to Scheduled once the schedule has been created.
Checking third-party services
The current KleanFlo workflow records third-party work as Contracted out. Contractor details are stored with the scheduled service notes, and external contractor tracking is planned for a future release. For now, users should check these services by reviewing the Scheduled or Not scheduled badge, planned dates, the View schedules action, and the Schedules calendar.
View additional services example
Cleaning specification
Review zone tasks and cleaning instructions so staff know what needs doing on site.
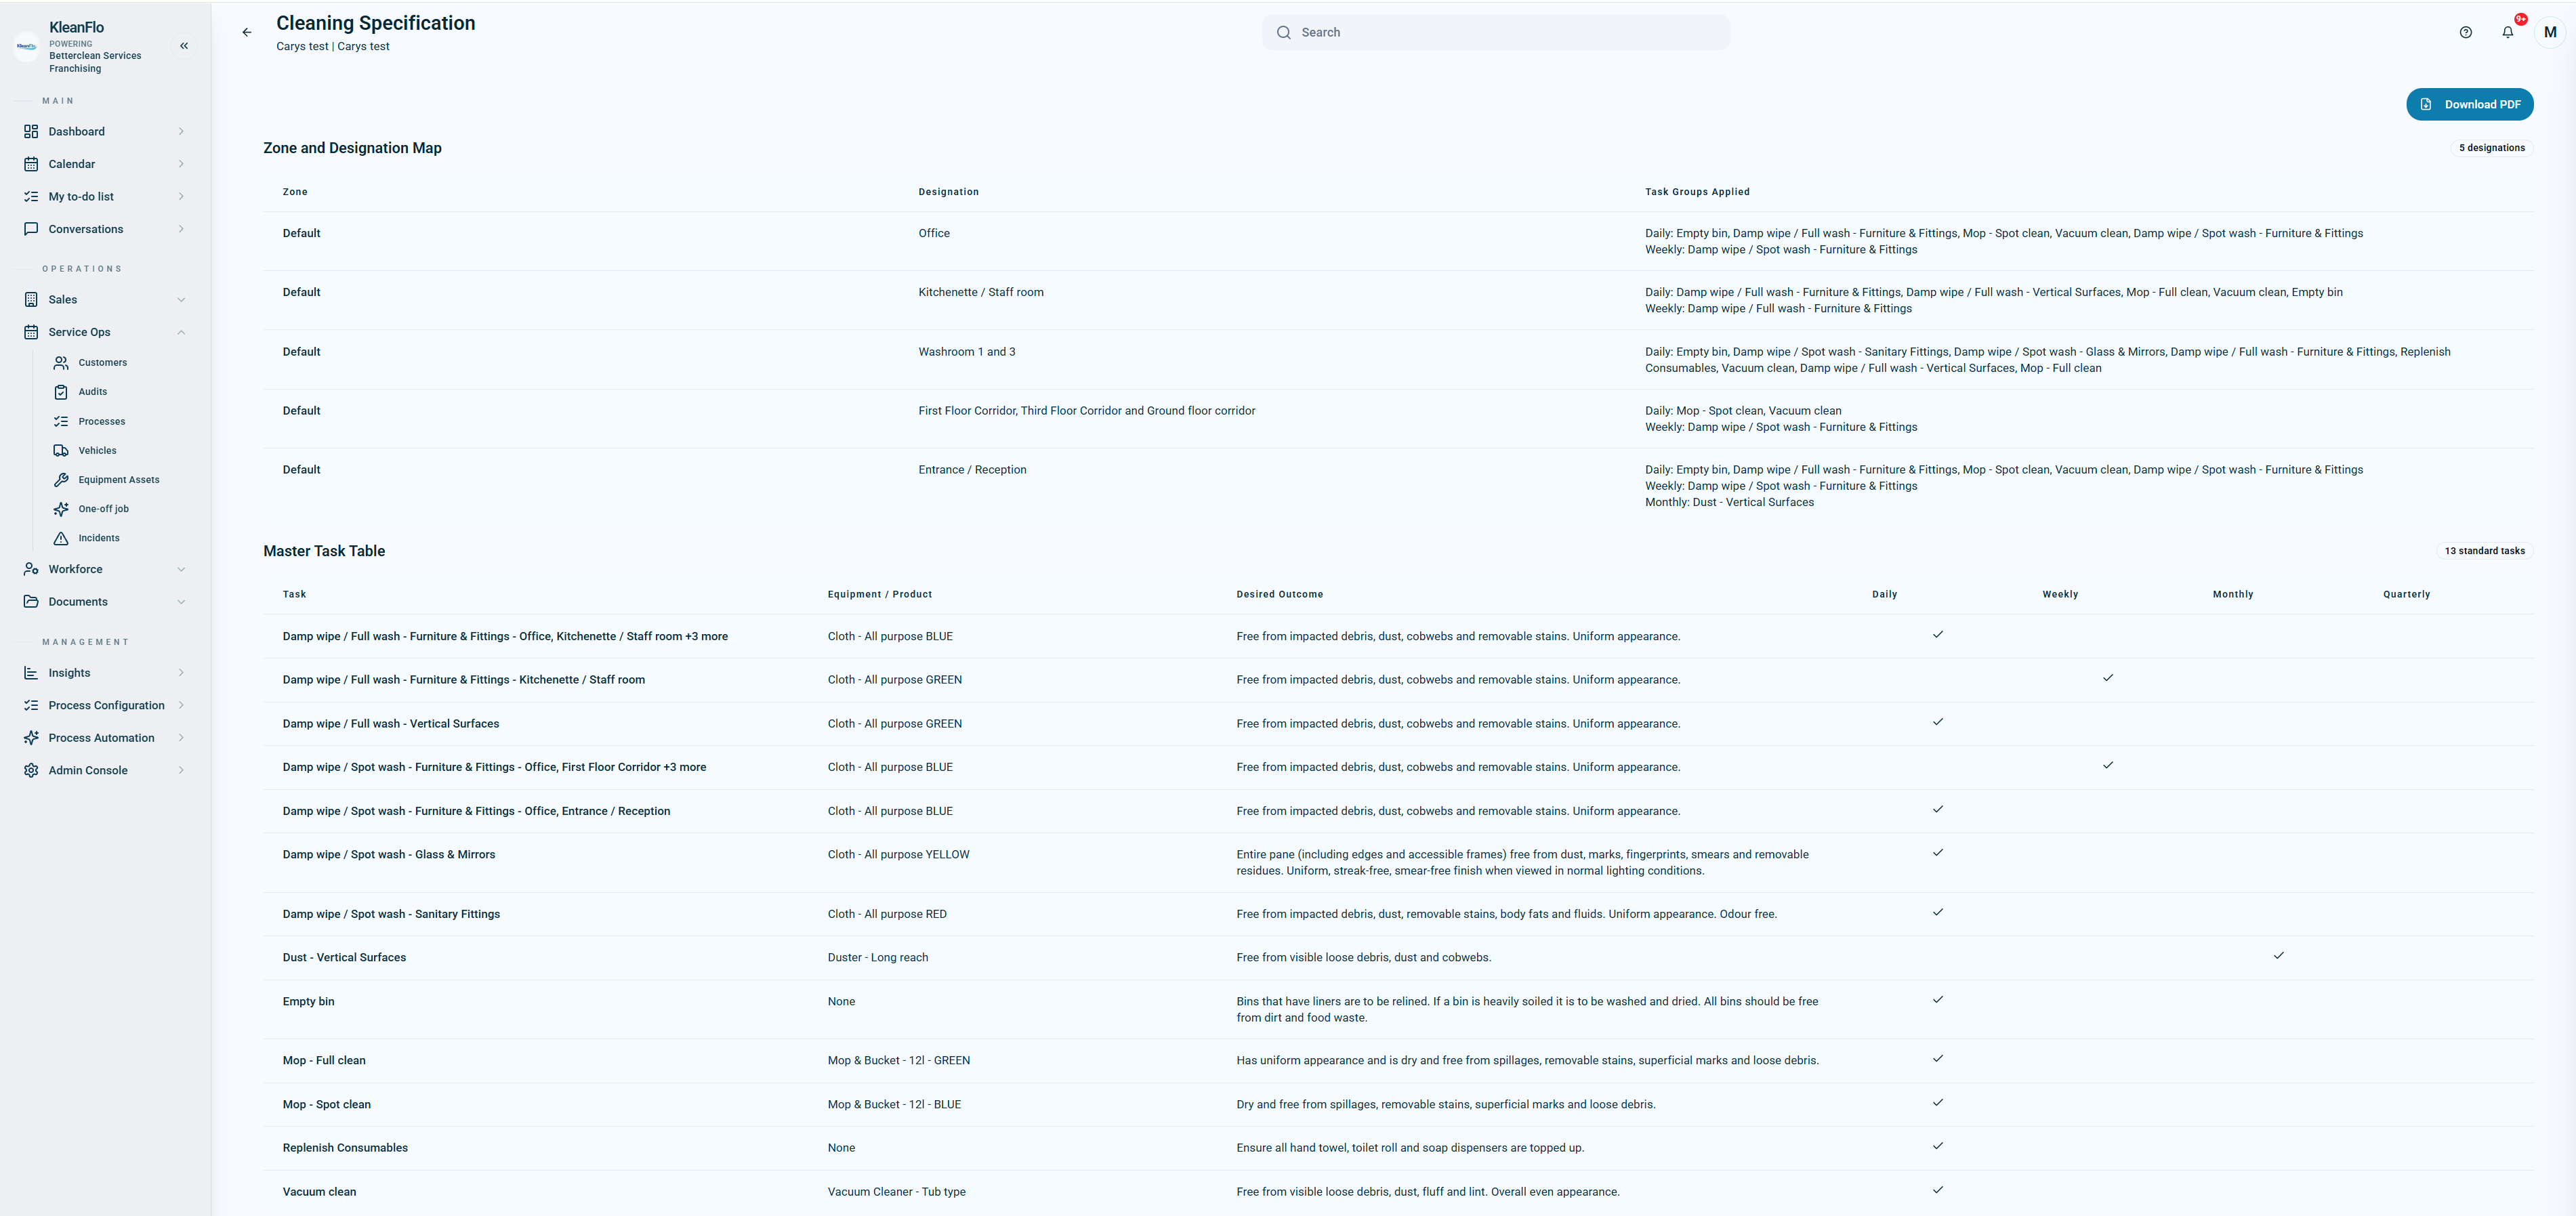
The cleaning specification is the practical instruction set for the site. It shows what work should be done, where it applies, what outcome is expected, and which equipment or chemical product should be used. It can be accessed from Schedule Wizard, from the customer site record, and by using View cleaning specification on the site actions menu.
Staff mobile appStaff use the cleaning specification on mobile so they can see the required tasks while working on site.
Customer portalCustomer contacts with portal access can view the customer-facing cleaning specification for their site.
PDF downloadThe full specification can be downloaded as a PDF when a printable or shareable copy is needed.
Sites and Schedule WizardUsers can open the specification from the Sites area or review it during Schedule Wizard setup.
What the specification should explain
- Designations and zones. Confirm each designation is in the correct zone so staff, audits, schedules, and the specification all point to the same work area.
- Tasks to complete. Check the task groups applied to each designation match what was sold and what the site actually needs.
- Desired outcomes. Make sure the expected finish is clear, such as dust free, odour free, uniform appearance, or bins relined.
- Equipment and products. Confirm the listed equipment, chemicals, cloth colours, mop colours, and consumables are correct for the task.
- Frequency. Check daily, weekly, monthly, or quarterly markings so the correct tasks appear at the right interval.
Before confirming the step
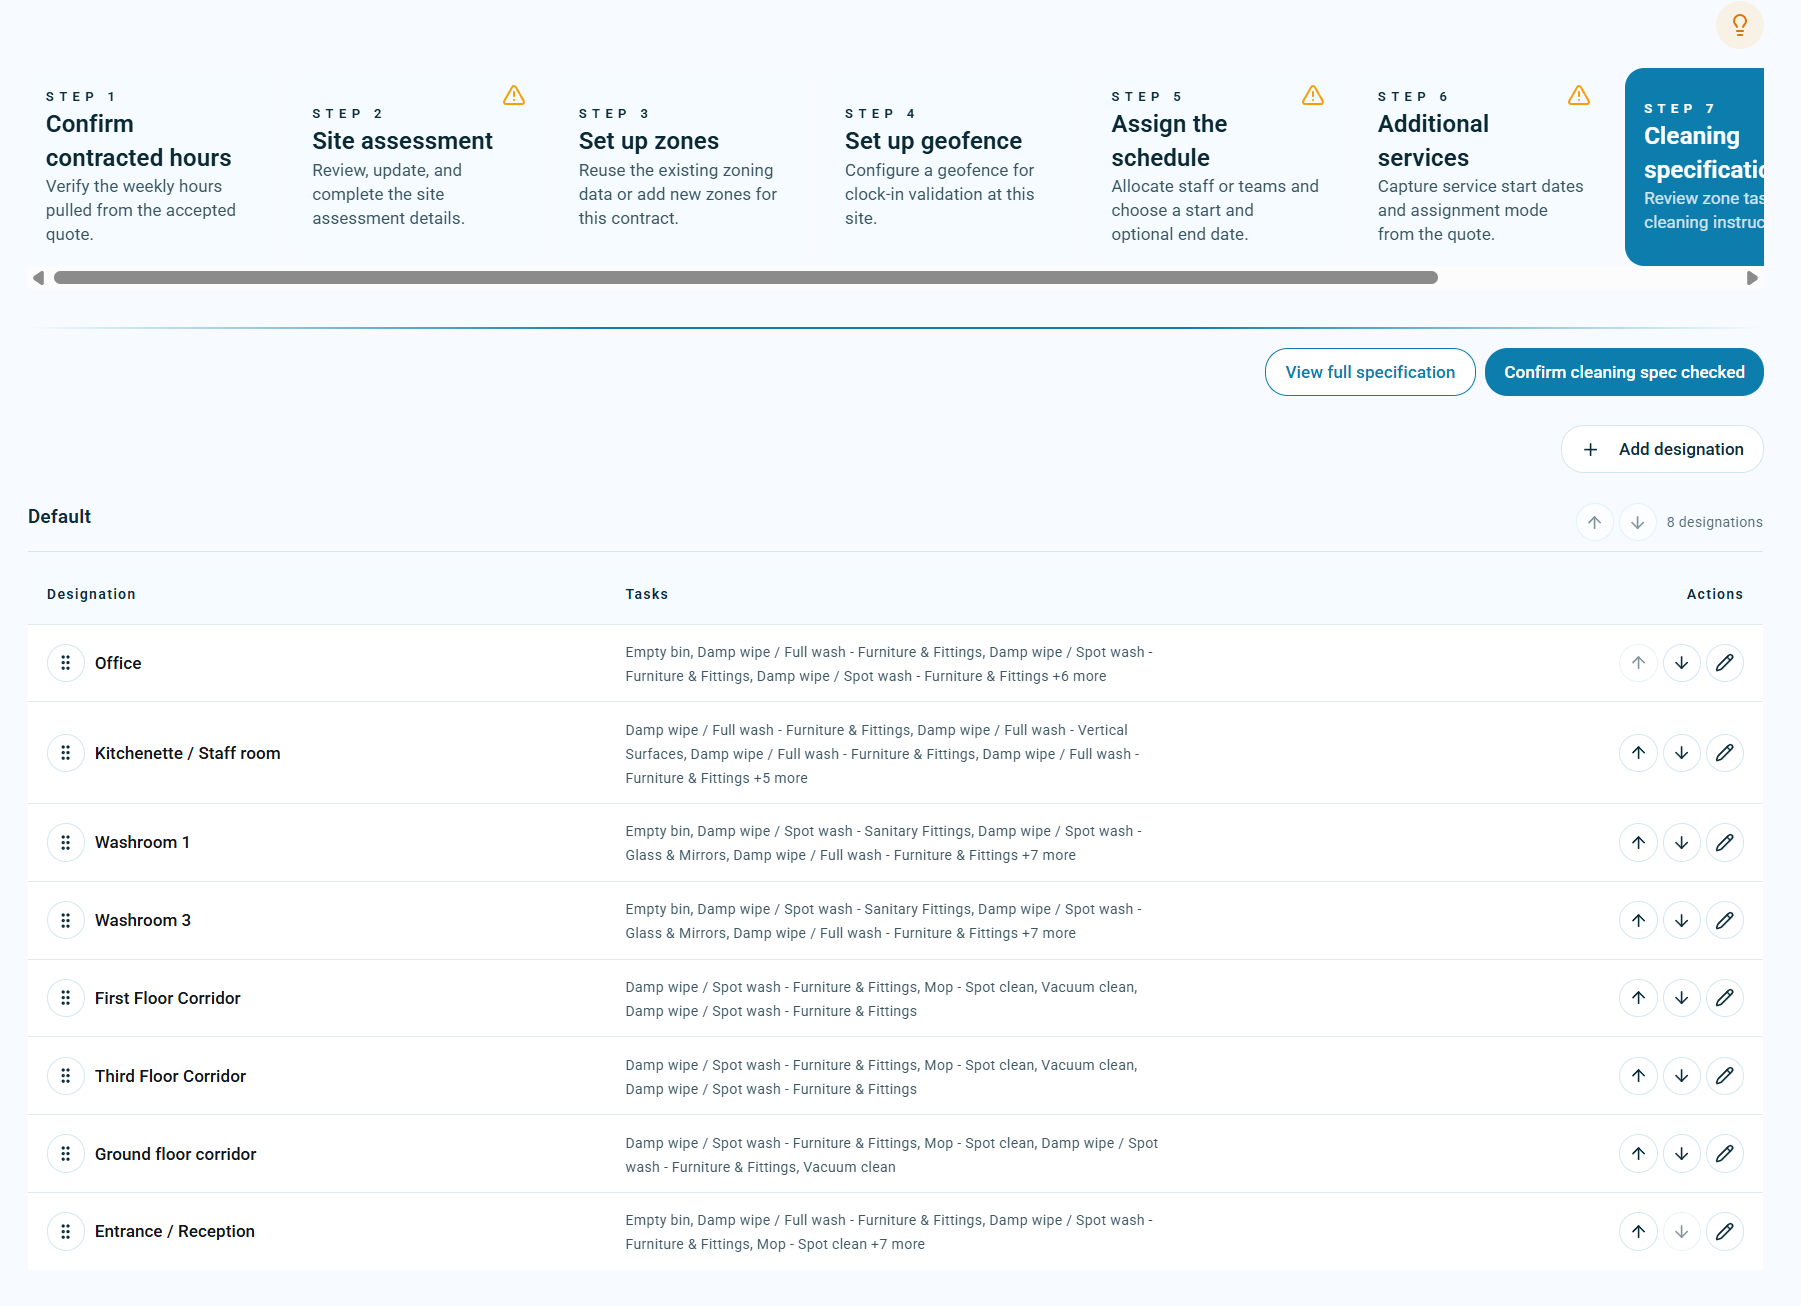
- Use View full specification to check the complete task table, not only the summary shown in Schedule Wizard.
- Use Add designation where a work area is missing before confirming the specification has been checked.
- If the specification is wrong, correct it before relying on staff app check-out confirmation or customer-facing portal information.
- When the specification is accurate, click Confirm cleaning spec checked so the Schedule Wizard step can be completed.
View cleaning specification examples
Audits
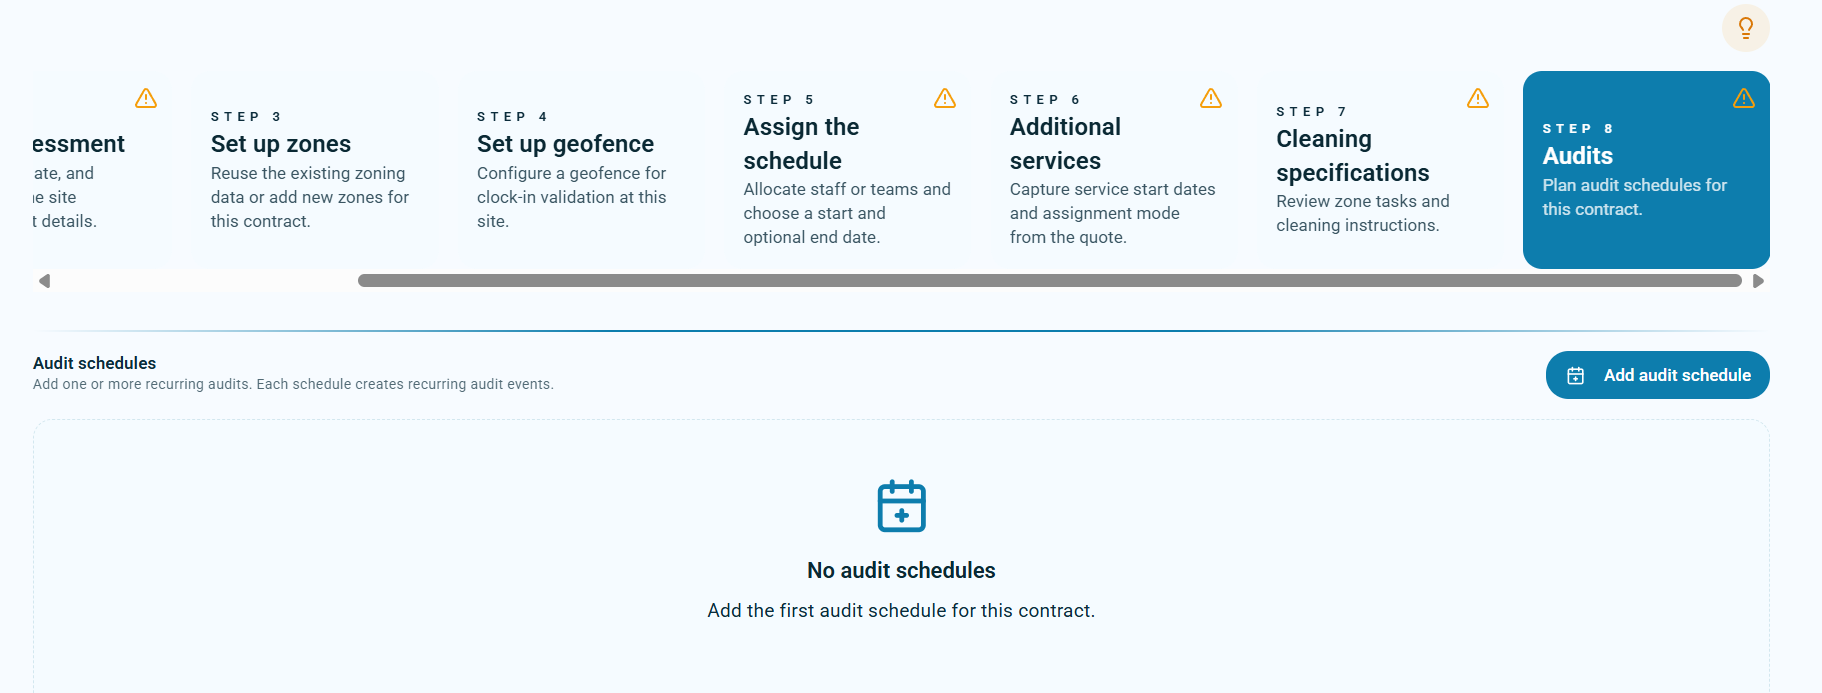
Plan audit schedules for the contract so supervisors know when quality checks are due.
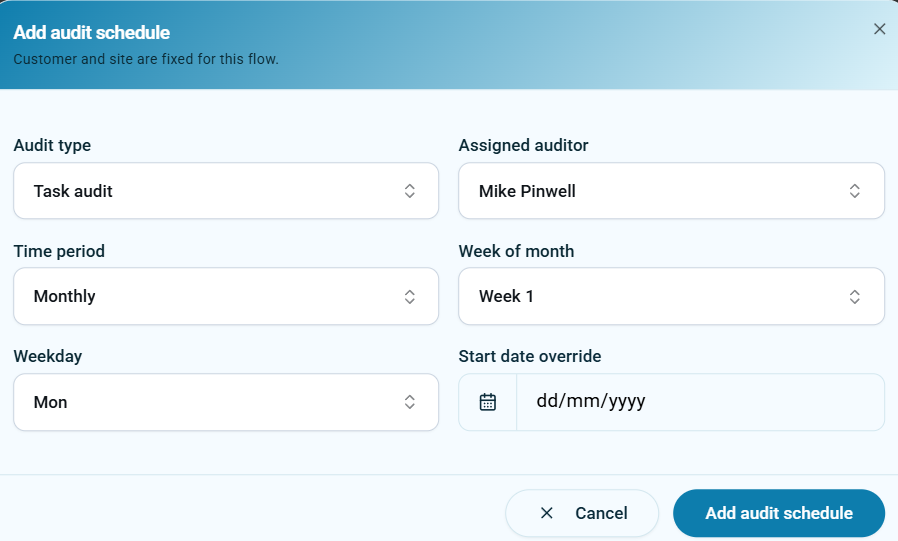
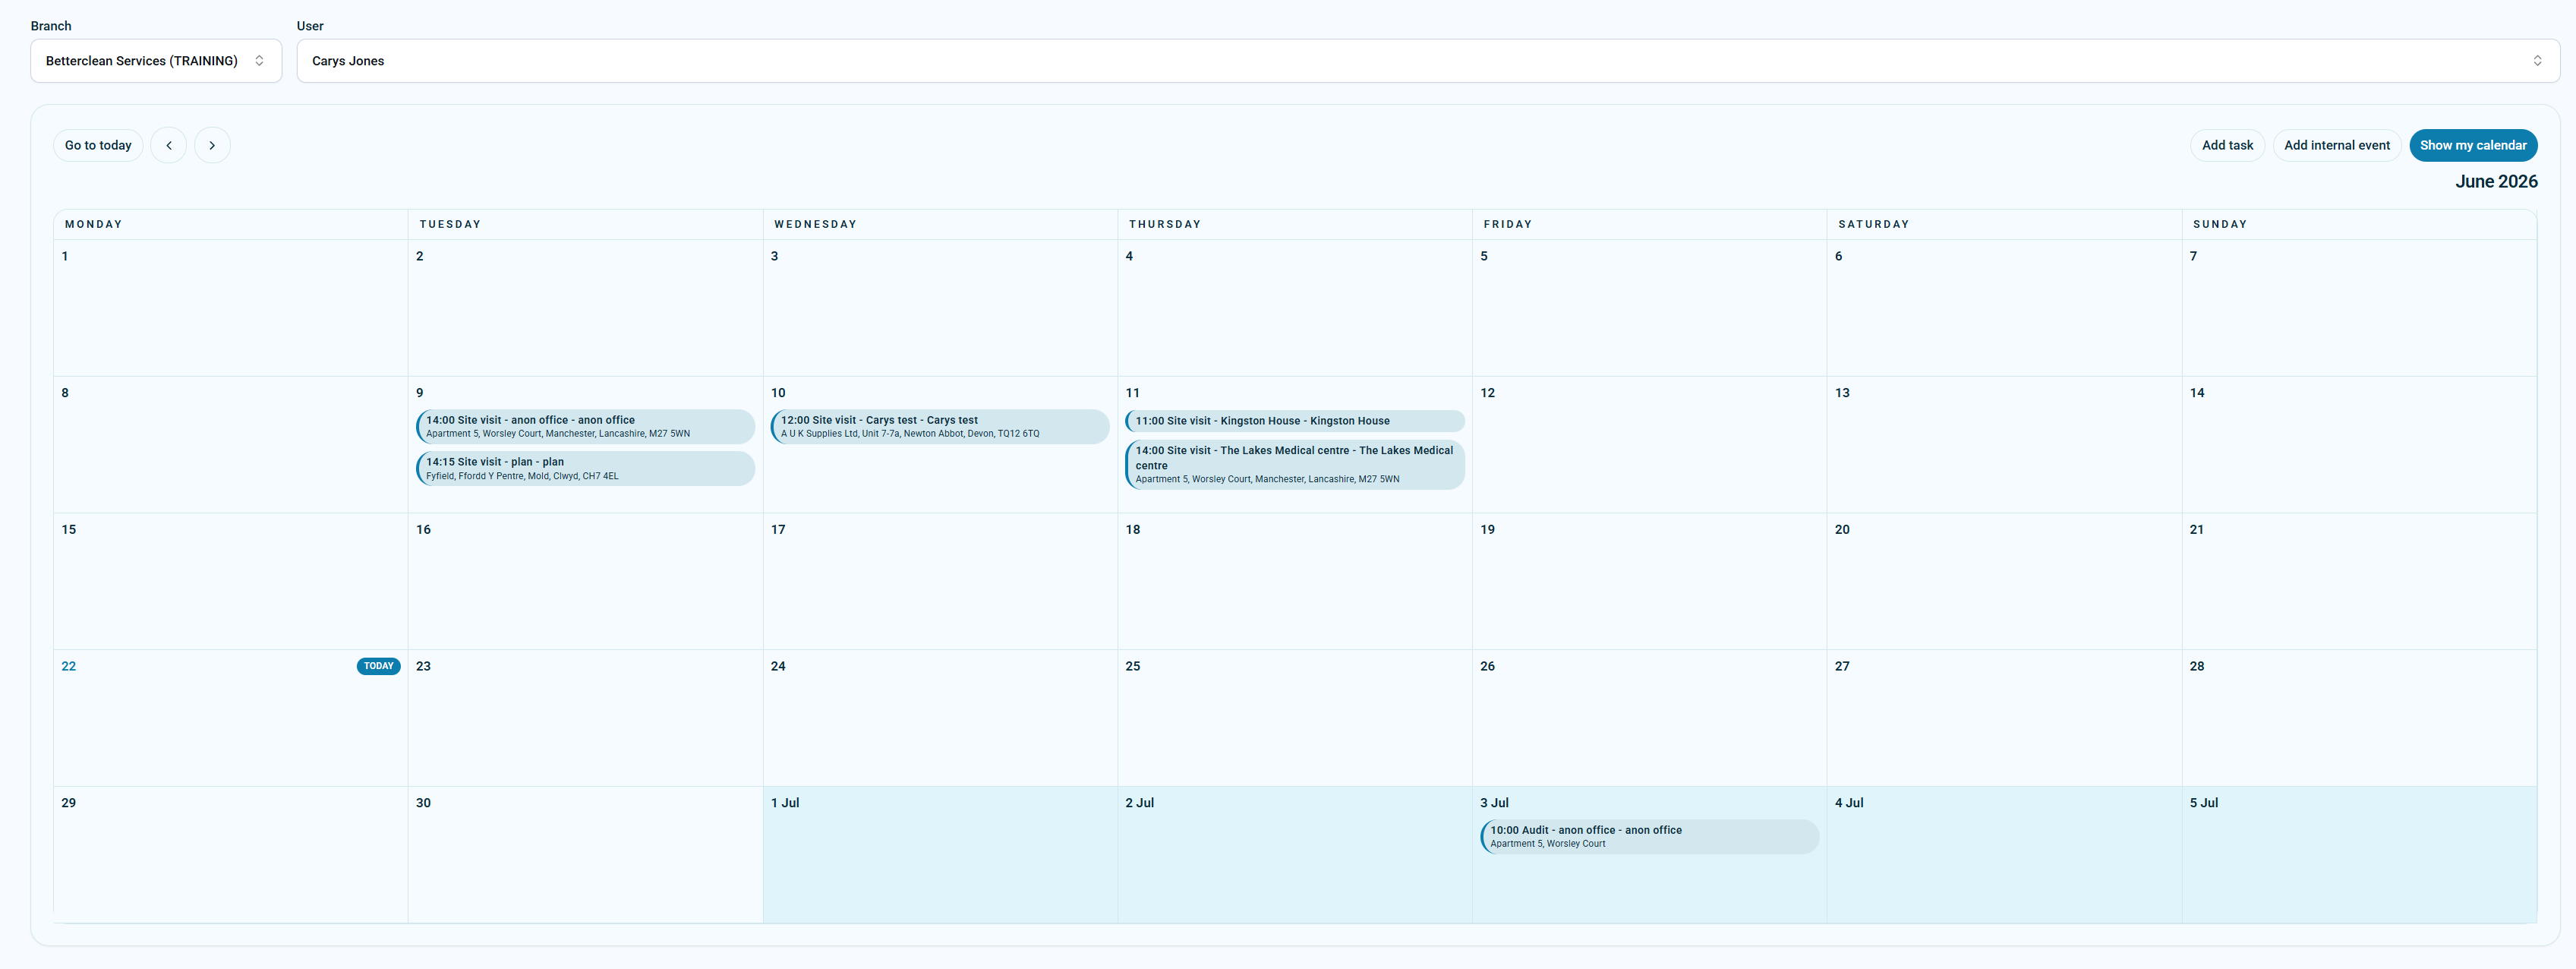
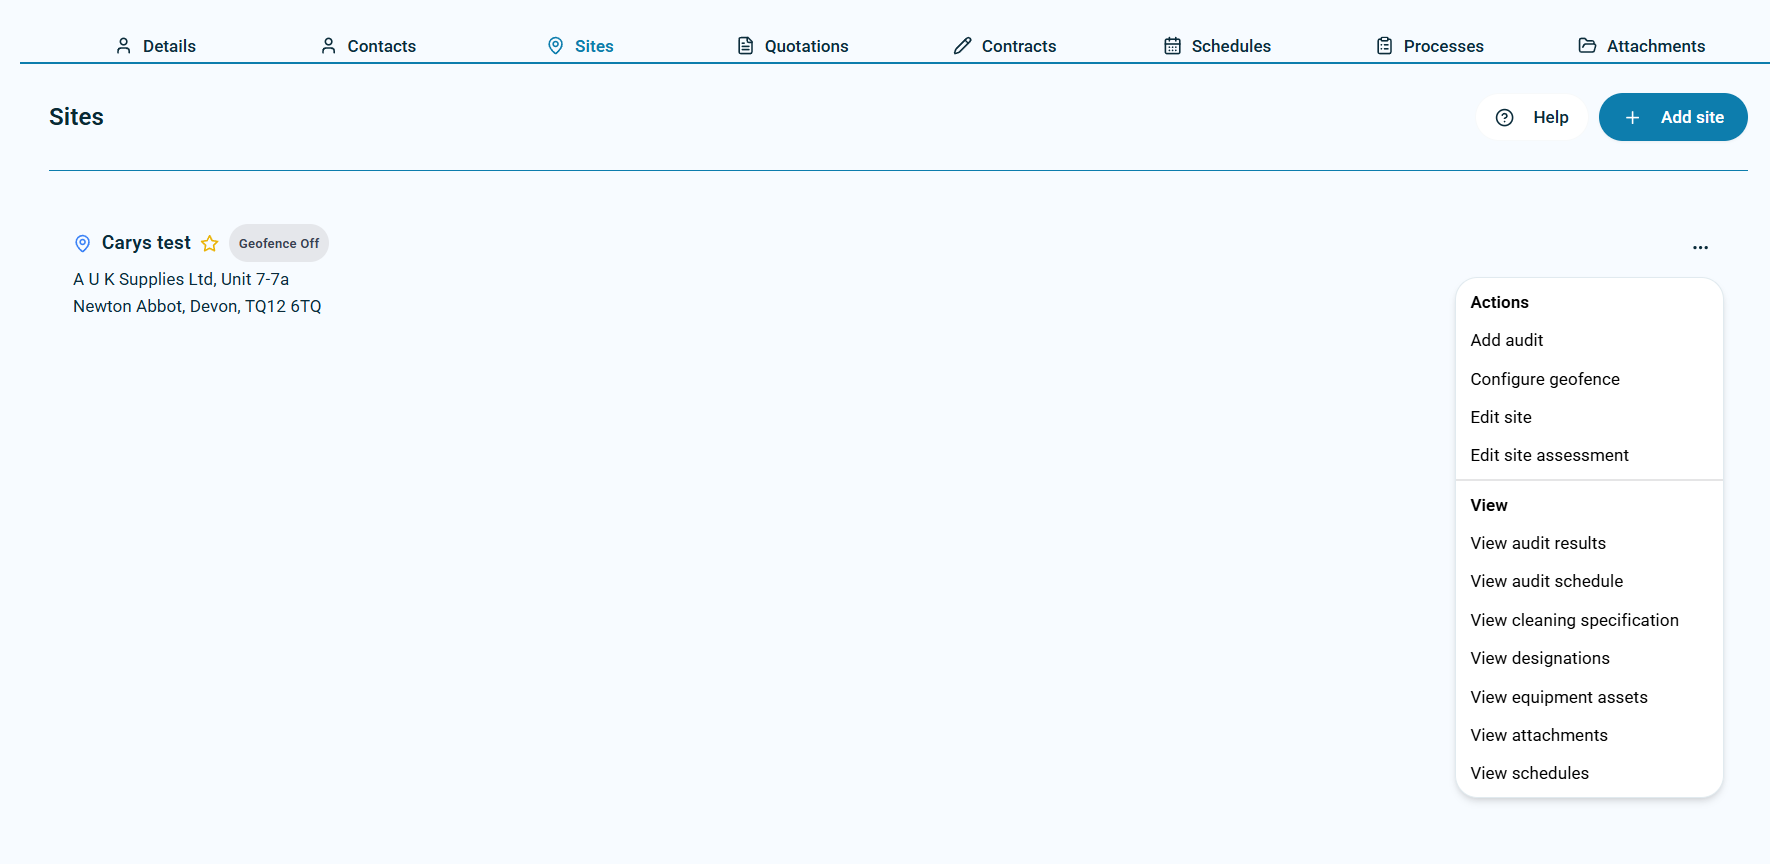
Audit schedules create recurring audit events for the selected customer and site. A task, designation, or zone audit can be added, assigned to an auditor, and given a frequency such as monthly. Scheduled audit events appear in the assigned supervisor's calendar and can be picked up through My to-do list and the On The Move app where the user has mobile audit access.
Task auditChecks the task-level work that should be completed for the site.
Designation auditChecks specific designations or areas, such as rooms, corridors, or receptions.
Zone auditChecks the zone as a grouped working area, useful where zones split the site between staff or work areas.
Assigned auditorThe supervisor selected on the audit schedule receives the calendar event and sees the audit action.
What to set
- Choose the audit type. Select task, designation, or zone depending on what needs checking.
- Assign the auditor. Pick the supervisor responsible for completing the audit.
- Set the time period. The default audit period is monthly, but audit schedules can also be set for other recurring periods where available.
- Choose the weekday and week of month. This controls when the recurring audit event will be generated.
- Use start date override where needed. Use this when the first audit needs to begin from a specific date rather than the default schedule timing.
- Add the audit schedule. KleanFlo creates recurring audit events and keeps future events rolling forward.
Where audit work appears
Notifications and overdue follow-up
Calendar and My to-do list are the confirmed places to check upcoming audit work. A separate morning-of-audit notification was not found in the current Cleanflow code. The current code sends a high-priority Audit reminder to the assigned supervisor when a scheduled audit has not been started after 24 hours, and an Audit escalation to the franchise owner if it is still not completed after 48 hours.
- Use Calendar and My to-do list as the main places to check audits before they are due.
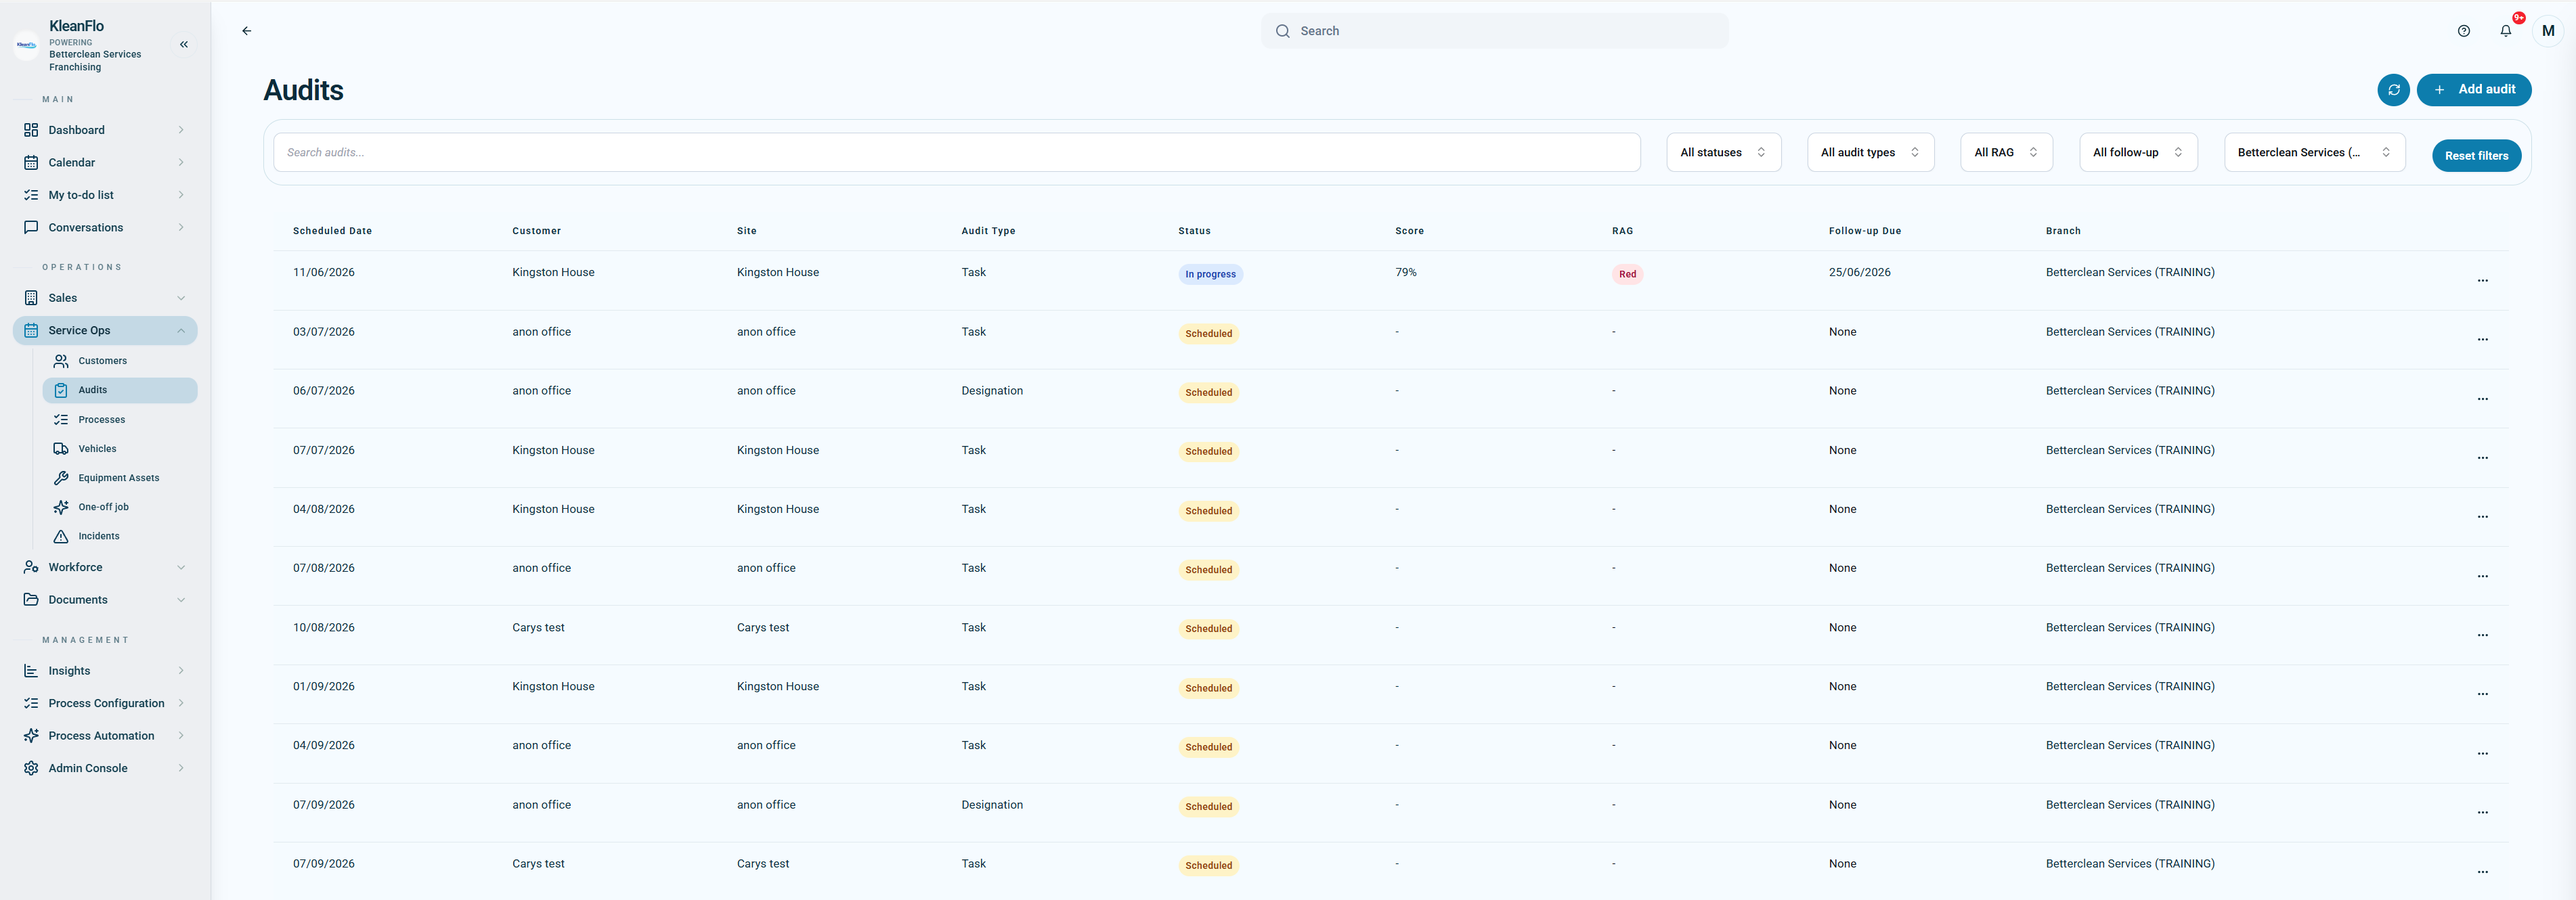
- Use the Audits menu to review scheduled and completed audits.
- Act quickly on Audit reminder or Audit escalation notifications because they mean the audit is overdue.
View audit schedule examples